Python的logging模块提供了标准的日志接口,你可以通过它便捷地记录和存储各种格式的日志。

Python Version: 3.5+

日志的等级

  1. DEBUG Detailed information, typically of interest only when diagnosing problems.
  2. INFO Confirmation that things are working as expected.
  3. WARNING An indication that something unexpected happened, or indicative of some problem in the near future (e.g. ‘disk space low’). The software is still working as expected.
  4. ERROR Due to a more serious problem, the software has not been able to perform some function.
  5. CRITICAL A serious error, indicating that the program itself may be unable to continue running.

logging

最简单的用法

1
2
3
4
5
6
7
8
import logging

logging.warning("user [ps] attempted wrong password more than 3 times")
logging.critical("server is down")

------------
WARNING:root:user [ps] attempted wrong password more than 3 times
CRITICAL:root:server is down

logging.basicConfig()

filename

Specifies that a FileHandler be created, using the specified
filename, rather than a StreamHandler

日志写入到文件,提供的文件名称

1
2
3
4
5
import logging
logging.basicConfig(filename='example.log')
logging.debug('This message should go to the log file')
logging.info('So should this')
logging.warning('And this, too')

example.log

1
2
3
DEBUG:root:This message should go to the log file
INFO:root:So should this
WARNING:root:And this, too

level

Set the root logger level to the specified level.

设置日志级别

bash cmd

1
rm -fr example.log

Python Code

1
2
3
4
5
import logging
logging.basicConfig(filename='example.log',level=logging.INFO)
logging.debug('This message should go to the log file')
logging.info('So should this')
logging.warning('And this, too')

example.log

1
2
INFO:root:So should this
WARNING:root:And this, too

明明写了三条日志,怎么会只有两条写入了呢?

在basicConfig中设置了level=logging.INFO,Python程序中,只有严重级别大于等于INFO级别的日志才会被写入到日志中

filemode

Specifies the mode to open the file, if filename is specified(if filemode is unspecified, it defaults to ‘a’)

设置文件打开的默认,如果不设置,默认为追加

在上面的小例子之前,我手动删除了之前已经生成的日志文件,现在我在不删除文件的情况下,再次执行一遍上面的代码,日志文件会被追加

1
2
3
4
INFO:root:So should this
WARNING:root:And this, too
INFO:root:So should this
WARNING:root:And this, too

如果改成w每次写入日志前,该文件内容都会被清空

1
2
3
import logging
logging.basicConfig(filename='example.log',filemode='w', level=logging.INFO)
logging.warning("filemode='w'")
1
WARNING:root:filemode='w'

datefmt

Use the specified date/time format.

使用time模块的日期格式来格式化日期或时间的显示

1
2
3
4
5
6
import logging
logging.basicConfig(format='%(asctime)s %(message)s', datefmt='%m/%d/%Y %I:%M:%S %p')
logging.warning('is when this event was logged.')

------------
12/12/2010 11:46:36 AM is when this event was logged.

format

Use the specified format string for the handler.

日志的格式设置

上面的例子已经用到的时间的格式输出到log,logging模块中,有如下信息可以被写入到日志

其他参数

  • stream Use the specified stream to initialize the StreamHandler. Note that this argument is incompatible with ‘filename’ - if both are present, ‘stream’ is ignored.
  • handlers If specified, this should be an iterable of already created handlers, which will be added to the root handler. Any handler in the list which does not have a formatter assigned will be assigned the formatter created in this function.

以上这两个参数,在logging对象中使用的情况比较多,将在后面logging对象中介绍和使用

同时在终端和日志文件中记录日志

1
2
3
4
5
6
7
8
9
10
11
12
13
14
15
16
17
18
19
20
21
22
23
24
25
26
27
28
29
30
31
import logging

#create logger
logger = logging.getLogger('TEST-LOG')
logger.setLevel(logging.DEBUG)


# create console handler and set level to debug
ch = logging.StreamHandler()
ch.setLevel(logging.DEBUG)

# create file handler and set level to warning
fh = logging.FileHandler("access.log")
fh.setLevel(logging.WARNING)
# create formatter
formatter = logging.Formatter('%(asctime)s - %(name)s - %(levelname)s - %(message)s')

# add formatter to ch and fh
ch.setFormatter(formatter)
fh.setFormatter(formatter)

# add ch and fh to logger
logger.addHandler(ch)
logger.addHandler(fh)

# 'application' code
logger.debug('debug message')
logger.info('info message')
logger.warn('warn message')
logger.error('error message')
logger.critical('critical message')

首先需要创建一个日志对象logger = logging.getLogger('TEST-LOG')

查看getLogger源码

1
2
3
4
5
6
7
8
9
10
def getLogger(name=None):
"""
Return a logger with the specified name, creating it if necessary.

If no name is specified, return the root logger.
"""
if name:
return Logger.manager.getLogger(name)
else:
return root

正常情况下return了Logger.manager.getLogger(name)

再去找manager

1
Logger.manager = Manager(Logger.root)

Logger.managerManager的实例化对象,再去找Manager

1
2
3
4
5
6
7
8
9
10
11
12
13
14
15
16
17
18
19
20
21
22
23
24
25
26
27
28
29
30
31
32
33
34
35
36
37
38
39
40
41
42
43
44
45
46
47
48
49
50
51
52
53
54
55
56
57
58
59
60
61
62
63
64
65
66
67
68
69
70
71
72
73
74
75
76
77
78
79
80
81
82
83
84
85
86
87
88
89
90
91
92
93
94
95
96
97
98
99
100
101
102
103
104
105
106
107
class Manager(object):
"""
There is [under normal circumstances] just one Manager instance, which
holds the hierarchy of loggers.
"""
def __init__(self, rootnode):
"""
Initialize the manager with the root node of the logger hierarchy.
"""
self.root = rootnode
self.disable = 0
self.emittedNoHandlerWarning = False
self.loggerDict = {}
self.loggerClass = None
self.logRecordFactory = None

def getLogger(self, name):
"""
Get a logger with the specified name (channel name), creating it
if it doesn't yet exist. This name is a dot-separated hierarchical
name, such as "a", "a.b", "a.b.c" or similar.

If a PlaceHolder existed for the specified name [i.e. the logger
didn't exist but a child of it did], replace it with the created
logger and fix up the parent/child references which pointed to the
placeholder to now point to the logger.
"""
rv = None
if not isinstance(name, str):
raise TypeError('A logger name must be a string')
_acquireLock()
try:
if name in self.loggerDict:
rv = self.loggerDict[name]
if isinstance(rv, PlaceHolder):
ph = rv
rv = (self.loggerClass or _loggerClass)(name)
rv.manager = self
self.loggerDict[name] = rv
self._fixupChildren(ph, rv)
self._fixupParents(rv)
else:
rv = (self.loggerClass or _loggerClass)(name)
rv.manager = self
self.loggerDict[name] = rv
self._fixupParents(rv)
finally:
_releaseLock()
return rv

def setLoggerClass(self, klass):
"""
Set the class to be used when instantiating a logger with this Manager.
"""
if klass != Logger:
if not issubclass(klass, Logger):
raise TypeError("logger not derived from logging.Logger: "
+ klass.__name__)
self.loggerClass = klass

def setLogRecordFactory(self, factory):
"""
Set the factory to be used when instantiating a log record with this
Manager.
"""
self.logRecordFactory = factory

def _fixupParents(self, alogger):
"""
Ensure that there are either loggers or placeholders all the way
from the specified logger to the root of the logger hierarchy.
"""
name = alogger.name
i = name.rfind(".")
rv = None
while (i > 0) and not rv:
substr = name[:i]
if substr not in self.loggerDict:
self.loggerDict[substr] = PlaceHolder(alogger)
else:
obj = self.loggerDict[substr]
if isinstance(obj, Logger):
rv = obj
else:
assert isinstance(obj, PlaceHolder)
obj.append(alogger)
i = name.rfind(".", 0, i - 1)
if not rv:
rv = self.root
alogger.parent = rv

def _fixupChildren(self, ph, alogger):
"""
Ensure that children of the placeholder ph are connected to the
specified logger.
"""
name = alogger.name
namelen = len(name)
for c in ph.loggerMap.keys():
#The if means ... if not c.parent.name.startswith(nm)
if c.parent.name[:namelen] != name:
alogger.parent = c.parent
c.parent = alogger

#---------------------------------------------------------------------------
# Logger classes and functions
#---------------------------------------------------------------------------

终于找到了!是在上面那里创建了一个logger对象

以后代码都是使用这个logger对象来操作的,那么我们来看看,这个logger对象里面都给我提供了哪些东西~~

1
2
3
4
5
6
7
8
9
10
11
12
13
14
15
16
17
18
19
20
21
22
23
24
25
26
27
28
29
30
31
32
33
34
35
36
37
38
39
40
41
42
43
44
45
46
47
48
49
50
51
52
53
54
55
56
57
58
59
60
61
62
63
64
65
66
67
68
69
70
71
72
73
74
75
76
77
78
79
80
81
82
83
84
85
86
87
88
89
90
91
92
93
94
95
96
97
98
99
100
101
102
103
104
105
106
107
108
109
110
111
112
113
114
115
116
117
118
119
120
121
122
123
124
125
126
127
128
129
130
131
132
133
134
135
136
137
138
139
140
141
142
143
144
145
146
147
148
149
150
151
152
153
154
155
156
157
158
159
160
161
162
163
164
165
166
167
168
169
170
171
172
173
174
175
176
177
178
179
180
181
182
183
184
185
186
187
188
189
190
191
192
193
194
195
196
197
198
199
200
201
202
203
204
205
206
207
208
209
210
211
212
213
214
215
216
217
218
219
220
221
222
223
224
225
226
227
228
229
230
231
232
233
234
235
236
237
238
239
240
241
242
243
244
245
246
247
248
249
250
251
252
253
254
255
256
257
258
259
260
261
262
263
264
265
266
267
268
269
270
271
272
273
274
275
276
277
278
279
280
281
282
283
284
285
286
287
288
289
290
291
292
293
294
295
296
297
298
299
300
301
302
303
304
305
306
307
308
309
310
311
312
313
314
315
316
317
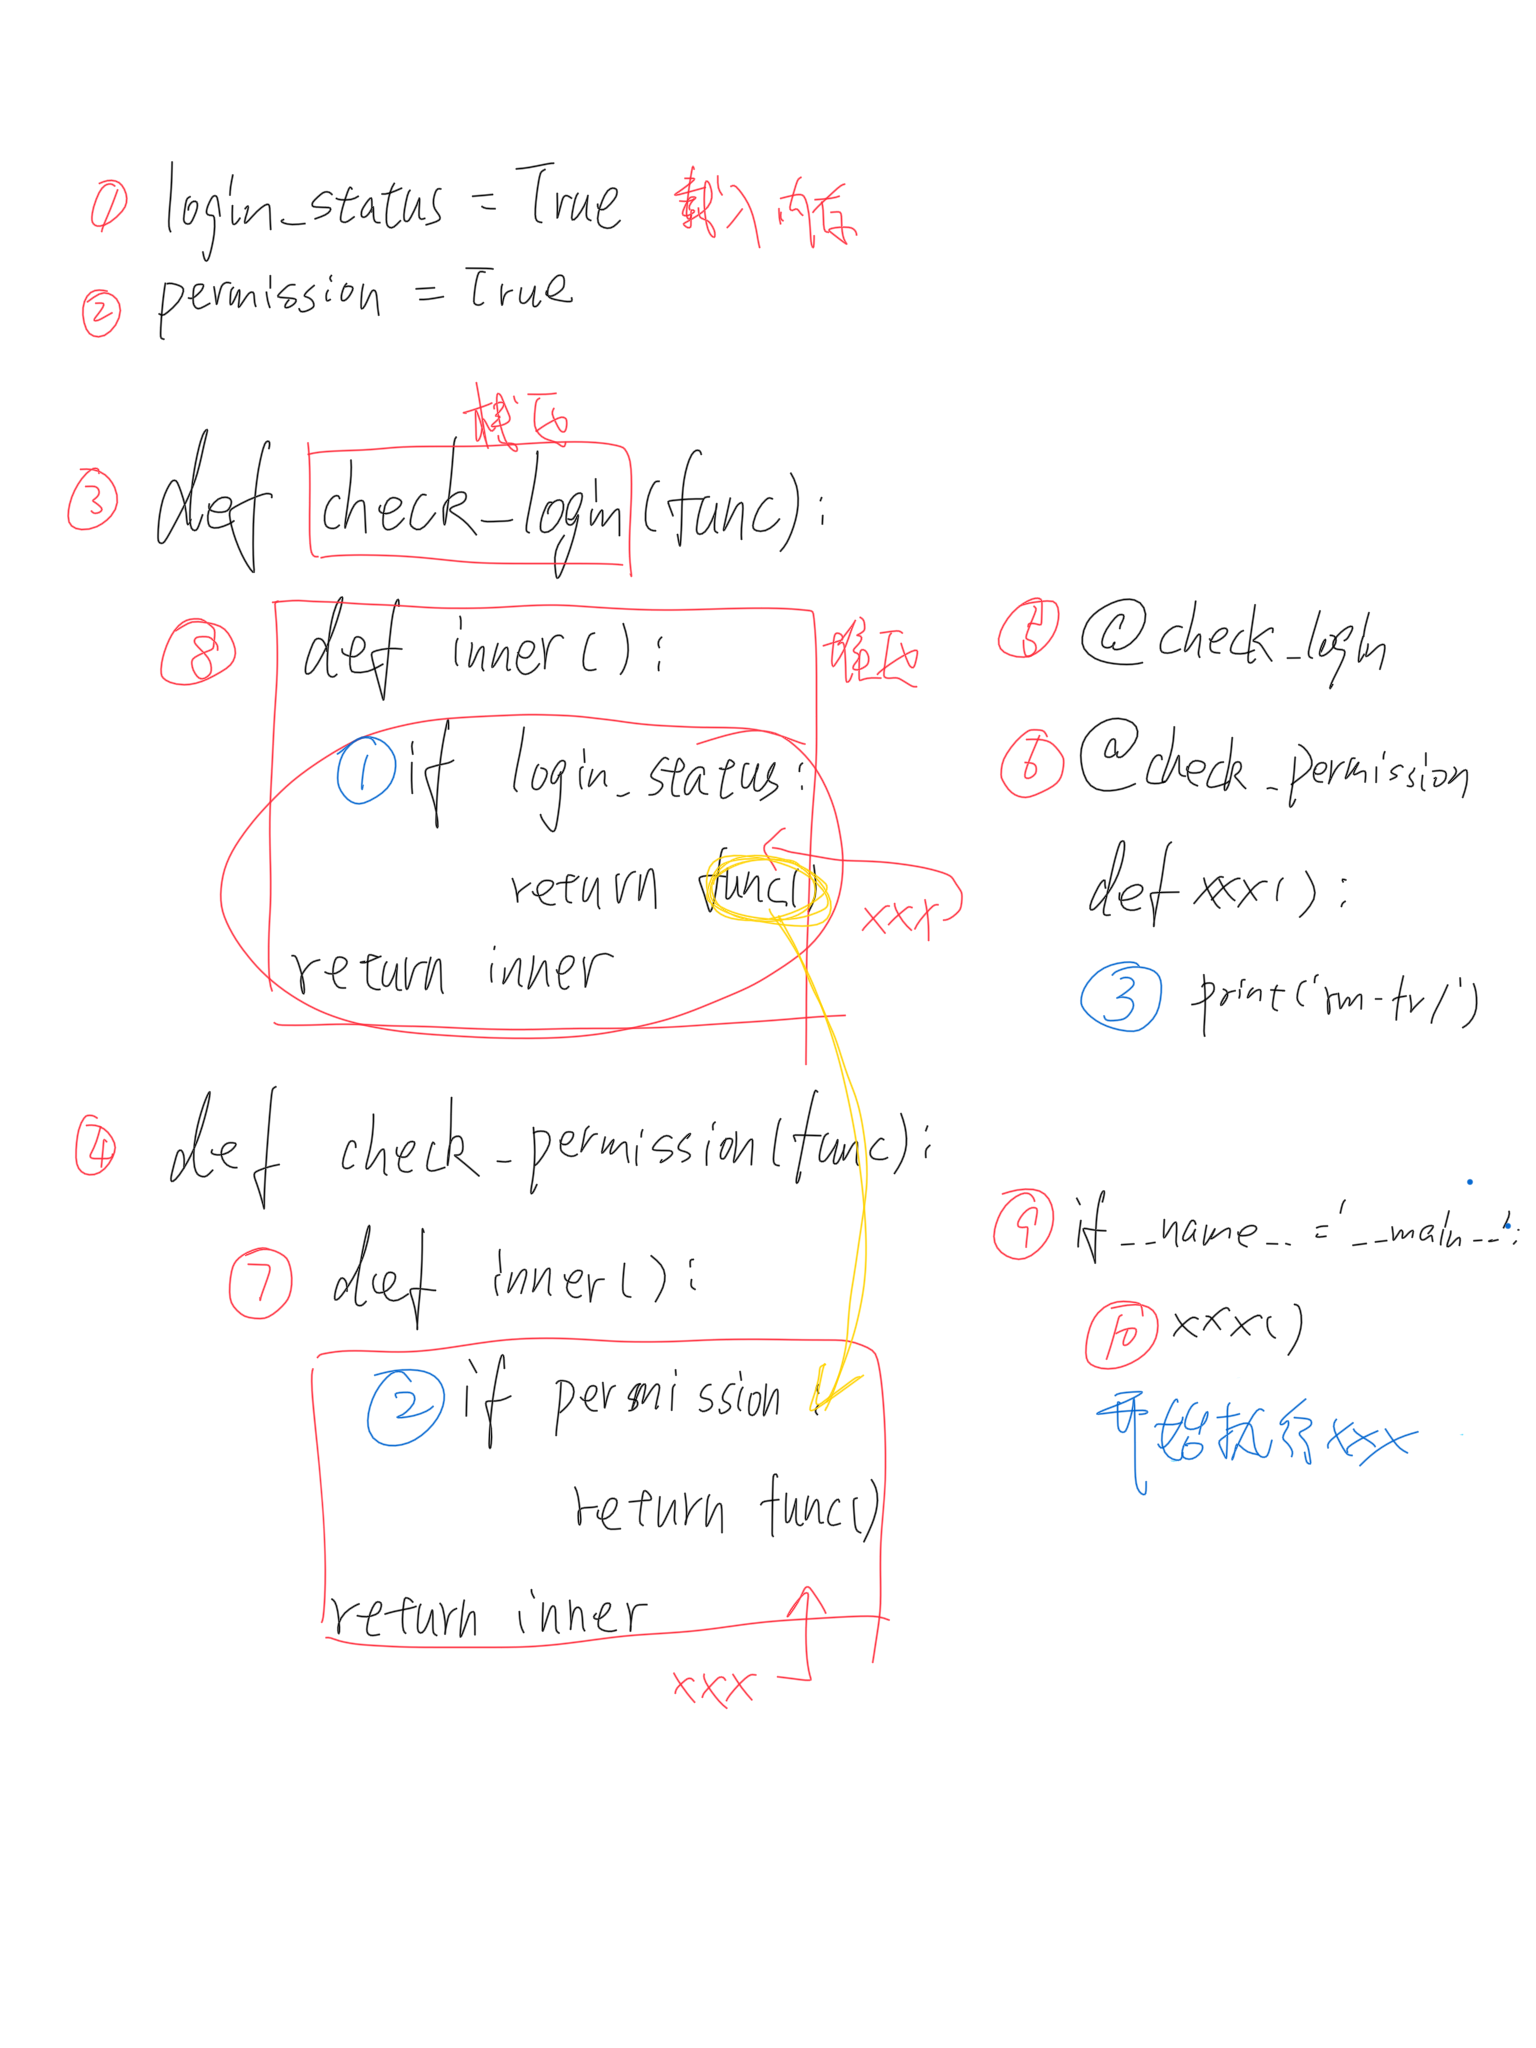
class Logger(Filterer):
"""
Instances of the Logger class represent a single logging channel. A
"logging channel" indicates an area of an application. Exactly how an
"area" is defined is up to the application developer. Since an
application can have any number of areas, logging channels are identified
by a unique string. Application areas can be nested (e.g. an area
of "input processing" might include sub-areas "read CSV files", "read
XLS files" and "read Gnumeric files"). To cater for this natural nesting,
channel names are organized into a namespace hierarchy where levels are
separated by periods, much like the Java or Python package namespace. So
in the instance given above, channel names might be "input" for the upper
level, and "input.csv", "input.xls" and "input.gnu" for the sub-levels.
There is no arbitrary limit to the depth of nesting.
"""
def __init__(self, name, level=NOTSET):
"""
Initialize the logger with a name and an optional level.
"""
Filterer.__init__(self)
self.name = name
self.level = _checkLevel(level)
self.parent = None
self.propagate = True
self.handlers = []
self.disabled = False

def setLevel(self, level):
"""
Set the logging level of this logger. level must be an int or a str.
"""
self.level = _checkLevel(level)

def debug(self, msg, *args, **kwargs):
"""
Log 'msg % args' with severity 'DEBUG'.

To pass exception information, use the keyword argument exc_info with
a true value, e.g.

logger.debug("Houston, we have a %s", "thorny problem", exc_info=1)
"""
if self.isEnabledFor(DEBUG):
self._log(DEBUG, msg, args, **kwargs)

def info(self, msg, *args, **kwargs):
"""
Log 'msg % args' with severity 'INFO'.

To pass exception information, use the keyword argument exc_info with
a true value, e.g.

logger.info("Houston, we have a %s", "interesting problem", exc_info=1)
"""
if self.isEnabledFor(INFO):
self._log(INFO, msg, args, **kwargs)

def warning(self, msg, *args, **kwargs):
"""
Log 'msg % args' with severity 'WARNING'.

To pass exception information, use the keyword argument exc_info with
a true value, e.g.

logger.warning("Houston, we have a %s", "bit of a problem", exc_info=1)
"""
if self.isEnabledFor(WARNING):
self._log(WARNING, msg, args, **kwargs)

def warn(self, msg, *args, **kwargs):
warnings.warn("The 'warn' method is deprecated, "
"use 'warning' instead", DeprecationWarning, 2)
self.warning(msg, *args, **kwargs)

def error(self, msg, *args, **kwargs):
"""
Log 'msg % args' with severity 'ERROR'.

To pass exception information, use the keyword argument exc_info with
a true value, e.g.

logger.error("Houston, we have a %s", "major problem", exc_info=1)
"""
if self.isEnabledFor(ERROR):
self._log(ERROR, msg, args, **kwargs)

def exception(self, msg, *args, exc_info=True, **kwargs):
"""
Convenience method for logging an ERROR with exception information.
"""
self.error(msg, *args, exc_info=exc_info, **kwargs)

def critical(self, msg, *args, **kwargs):
"""
Log 'msg % args' with severity 'CRITICAL'.

To pass exception information, use the keyword argument exc_info with
a true value, e.g.

logger.critical("Houston, we have a %s", "major disaster", exc_info=1)
"""
if self.isEnabledFor(CRITICAL):
self._log(CRITICAL, msg, args, **kwargs)

fatal = critical

def log(self, level, msg, *args, **kwargs):
"""
Log 'msg % args' with the integer severity 'level'.

To pass exception information, use the keyword argument exc_info with
a true value, e.g.

logger.log(level, "We have a %s", "mysterious problem", exc_info=1)
"""
if not isinstance(level, int):
if raiseExceptions:
raise TypeError("level must be an integer")
else:
return
if self.isEnabledFor(level):
self._log(level, msg, args, **kwargs)

def findCaller(self, stack_info=False):
"""
Find the stack frame of the caller so that we can note the source
file name, line number and function name.
"""
f = currentframe()
#On some versions of IronPython, currentframe() returns None if
#IronPython isn't run with -X:Frames.
if f is not None:
f = f.f_back
rv = "(unknown file)", 0, "(unknown function)", None
while hasattr(f, "f_code"):
co = f.f_code
filename = os.path.normcase(co.co_filename)
if filename == _srcfile:
f = f.f_back
continue
sinfo = None
if stack_info:
sio = io.StringIO()
sio.write('Stack (most recent call last):\n')
traceback.print_stack(f, file=sio)
sinfo = sio.getvalue()
if sinfo[-1] == '\n':
sinfo = sinfo[:-1]
sio.close()
rv = (co.co_filename, f.f_lineno, co.co_name, sinfo)
break
return rv

def makeRecord(self, name, level, fn, lno, msg, args, exc_info,
func=None, extra=None, sinfo=None):
"""
A factory method which can be overridden in subclasses to create
specialized LogRecords.
"""
rv = _logRecordFactory(name, level, fn, lno, msg, args, exc_info, func,
sinfo)
if extra is not None:
for key in extra:
if (key in ["message", "asctime"]) or (key in rv.__dict__):
raise KeyError("Attempt to overwrite %r in LogRecord" % key)
rv.__dict__[key] = extra[key]
return rv

def _log(self, level, msg, args, exc_info=None, extra=None, stack_info=False):
"""
Low-level logging routine which creates a LogRecord and then calls
all the handlers of this logger to handle the record.
"""
sinfo = None
if _srcfile:
#IronPython doesn't track Python frames, so findCaller raises an
#exception on some versions of IronPython. We trap it here so that
#IronPython can use logging.
try:
fn, lno, func, sinfo = self.findCaller(stack_info)
except ValueError: # pragma: no cover
fn, lno, func = "(unknown file)", 0, "(unknown function)"
else: # pragma: no cover
fn, lno, func = "(unknown file)", 0, "(unknown function)"
if exc_info:
if isinstance(exc_info, BaseException):
exc_info = (type(exc_info), exc_info, exc_info.__traceback__)
elif not isinstance(exc_info, tuple):
exc_info = sys.exc_info()
record = self.makeRecord(self.name, level, fn, lno, msg, args,
exc_info, func, extra, sinfo)
self.handle(record)

def handle(self, record):
"""
Call the handlers for the specified record.

This method is used for unpickled records received from a socket, as
well as those created locally. Logger-level filtering is applied.
"""
if (not self.disabled) and self.filter(record):
self.callHandlers(record)

def addHandler(self, hdlr):
"""
Add the specified handler to this logger.
"""
_acquireLock()
try:
if not (hdlr in self.handlers):
self.handlers.append(hdlr)
finally:
_releaseLock()

def removeHandler(self, hdlr):
"""
Remove the specified handler from this logger.
"""
_acquireLock()
try:
if hdlr in self.handlers:
self.handlers.remove(hdlr)
finally:
_releaseLock()

def hasHandlers(self):
"""
See if this logger has any handlers configured.

Loop through all handlers for this logger and its parents in the
logger hierarchy. Return True if a handler was found, else False.
Stop searching up the hierarchy whenever a logger with the "propagate"
attribute set to zero is found - that will be the last logger which
is checked for the existence of handlers.
"""
c = self
rv = False
while c:
if c.handlers:
rv = True
break
if not c.propagate:
break
else:
c = c.parent
return rv

def callHandlers(self, record):
"""
Pass a record to all relevant handlers.

Loop through all handlers for this logger and its parents in the
logger hierarchy. If no handler was found, output a one-off error
message to sys.stderr. Stop searching up the hierarchy whenever a
logger with the "propagate" attribute set to zero is found - that
will be the last logger whose handlers are called.
"""
c = self
found = 0
while c:
for hdlr in c.handlers:
found = found + 1
if record.levelno >= hdlr.level:
hdlr.handle(record)
if not c.propagate:
c = None #break out
else:
c = c.parent
if (found == 0):
if lastResort:
if record.levelno >= lastResort.level:
lastResort.handle(record)
elif raiseExceptions and not self.manager.emittedNoHandlerWarning:
sys.stderr.write("No handlers could be found for logger"
" \"%s\"\n" % self.name)
self.manager.emittedNoHandlerWarning = True

def getEffectiveLevel(self):
"""
Get the effective level for this logger.

Loop through this logger and its parents in the logger hierarchy,
looking for a non-zero logging level. Return the first one found.
"""
logger = self
while logger:
if logger.level:
return logger.level
logger = logger.parent
return NOTSET

def isEnabledFor(self, level):
"""
Is this logger enabled for level 'level'?
"""
if self.manager.disable >= level:
return False
return level >= self.getEffectiveLevel()

def getChild(self, suffix):
"""
Get a logger which is a descendant to this one.

This is a convenience method, such that

logging.getLogger('abc').getChild('def.ghi')

is the same as

logging.getLogger('abc.def.ghi')

It's useful, for example, when the parent logger is named using
__name__ rather than a literal string.
"""
if self.root is not self:
suffix = '.'.join((self.name, suffix))
return self.manager.getLogger(suffix)

上面实例中用到的logger.setLevel logger.addHandler logger.debug logger.info logger.warn logger.error logger.critical 都是这里提供的功能,这些都是对象方法,设置的参数和打印的日志都是对象的行为,与logging类一定要区分开(logging.basicConfig是类方法,logger.setLevel是对象方法)

formatter = logging.Formatter('%(asctime)s - %(name)s - %(levelname)s - %(message)s'),这句的意思是生成了一个formatter对象,这个对象保存了日志输出的格式,实例中,这个对象被当做参数传递到了logging.StreamHandler()logging.FileHandler("access.log")对象中,意思是声明让这两个日志输出形式以formatter对象指定的格式进行输出

最后需要说明的是logger.addHandler, Handler是输出方式,logging.StreamHandler()是输出到屏幕的对象(句柄),logging.FileHandler("access.log")是输出到文件的对象(句柄),上面的实例中,将这两个对象都添加到了logger对象中,所以使logger拥有了既输出到屏幕又写入到日志的能力。

Python常用的跟时间相关的模块有两个timedatetime

其中datetimetime模块更高层次的封装,在实际使用中,两个模块各有千秋

Python Version: 3.5+

time

1
2
3
4
5
6
7
8
9
10
11
12
13
14
15
16
17
18
19
20
21
22
23
24
25
26
27
28
29
30
31
32
33
34
35
36
37
38
39
40
41
42
43
44
>>> import time
>>>
>>> time.time() #获取时间戳,从1970年1月1日0:00到现在的秒数
1465321187.56645
>>> time.time() - 86400 #可以按需 + - 秒数
1465234811.8091
>>>
>>> time.ctime() #返回'Wed Jun 8 01:42:41 2016'格式的日期时间字符串
'Wed Jun 8 01:42:41 2016'
>>> time.ctime() - 86400 #报错!ctime返回的字符串,是不能 + - 的
Traceback (most recent call last):
File "<input>", line 1, in <module>
TypeError: unsupported operand type(s) for -: 'str' and 'int'
>>> time.ctime(time.time() - 86400) #ctime可以接收时间戳参数并转化为日期时间字符串,通过这个功能,可以把时间戳的时间进行 + - 后传递给ctime进行转换
'Tue Jun 7 01:45:09 2016'
>>>
>>> time.gmtime() #返回一个格式化的时间对象
time.struct_time(tm_year=2016, tm_mon=6, tm_mday=7, tm_hour=17, tm_min=47, tm_sec=1, tm_wday=1, tm_yday=159, tm_isdst=0)
>>> type(time.gmtime())
<class 'time.struct_time'>
>>> time.gmtime(time.time() - 86400) #也可以通过传递时间戳来更改时间
time.struct_time(tm_year=2016, tm_mon=6, tm_mday=6, tm_hour=17, tm_min=48, tm_sec=27, tm_wday=0, tm_yday=158, tm_isdst=0)
>>> time.gmtime()[0] #可以通过索引的方式去取值
2016
>>> time.gmtime()[1]
6
>>> time.gmtime()[2] #问题来了,现在已经是8号了却还显示7,是因为这里显示的是格林威治时间,不是本地时间
7
>>>
>>> time.localtime() #本地时间来了!这个方法显示的是本地时区的时间!返回的格式与gmtime是一样的,用法也一样
time.struct_time(tm_year=2016, tm_mon=6, tm_mday=8, tm_hour=1, tm_min=56, tm_sec=5, tm_wday=2, tm_yday=160, tm_isdst=0)
>>>
>>> time.mktime(time.localtime()) #该方法接收一个tuple类型的参数,可接收struct_time对象并将其转化为时间戳
1465322289.0
>>>
>>> time.strftime("%Y-%m-%d", time.localtime()) #将struct_time对象以指定的格式显示
'2016-06-08'
>>> time.strptime('2016-06-08', "%Y-%m-%d") #将日期字符串以指定的格式转化为struct_time对象
time.struct_time(tm_year=2016, tm_mon=6, tm_mday=8, tm_hour=0, tm_min=0, tm_sec=0, tm_wday=2, tm_yday=160, tm_isdst=-1)
>>>
>>> time.sleep(4)
>>>
>>> time.clock() #在Unix系统上表示进程时间。在Windows上第一次返回进程时间,第二次返回第一次到第二次之间的时间
29.472588

datetime

1
2
3
4
5
6
7
8
9
10
11
12
13
14
15
16
17
18
19
20
21
22
23
24
25
26
27
28
29
>>> datetime.date.today()  #2016-06-08
datetime.date(2016, 6, 8)
>>> print(datetime.date.today())
2016-06-08
>>>
>>> datetime.date.fromtimestamp(time.time()) #将时间戳转为日期格式
datetime.date(2016, 6, 8)
>>>
>>> datetime.datetime.now() #返回当前时间
datetime.datetime(2016, 6, 8, 2, 18, 57, 453874)
>>> print(datetime.datetime.now())
2016-06-08 02:19:08.895585
>>> datetime.datetime.now().timetuple() #转化为struct_time对象
time.struct_time(tm_year=2016, tm_mon=6, tm_mday=8, tm_hour=2, tm_min=20, tm_sec=17, tm_wday=2, tm_yday=160, tm_isdst=-1)
>>>
>>> datetime.datetime.now().replace(2015, 5, 9) #替换指定的日期或时间
datetime.datetime(2015, 5, 9, 2, 21, 39, 897457)
>>>
>>> datetime.datetime.strptime("09/05/15 7:56", "%d/%m/%y %H:%M") #将日期时间字符串转为时间格式,并以指定的格式进行显示
datetime.datetime(2015, 5, 9, 7, 56)
>>>
>>> datetime.datetime.now() + datetime.timedelta(days=10) #比现在加10天
datetime.datetime(2016, 6, 18, 2, 26, 46, 45019)
>>> datetime.datetime.now() + datetime.timedelta(days=-10) #比现在减10天
datetime.datetime(2016, 5, 29, 2, 26, 53, 536217)
>>> datetime.datetime.now() + datetime.timedelta(hours=-10) #比现在减10小时
datetime.datetime(2016, 6, 7, 16, 27, 0, 717995)
>>> datetime.datetime.now() + datetime.timedelta(seconds=120) #比现在+120s
datetime.datetime(2016, 6, 8, 2, 29, 7, 456727)

  • 附录1:
索引(Index) 属性(Attribute) 值(Values)
0 tm_year(年) 比如2011
1 tm_mon(月) 1 - 12
2 tm_mday(日) 1 - 31
3 tm_hour(时) 0 - 23
4 tm_min(分) 0 - 59
5 tm_sec(秒) 0 - 61
6 tm_wday(weekday) 0 - 6(0表示周日)
7 tm_yday(一年中的第几天) 1 - 366
8 tm_isdst(是否是夏令时) 默认为-1
  • 附录2:
格式 含义
%a 本地(locale)简化星期名称
%A 本地完整星期名称
%b 本地简化月份名称
%B 本地完整月份名称
%c 本地相应的日期和时间表示
%d 一个月中的第几天(01 - 31)
%H 一天中的第几个小时(24小时制,00 - 23)
%I 第几个小时(12小时制,01 - 12)
%j 一年中的第几天(001 - 366)
%m 月份(01 - 12)
%M 分钟数(00 - 59)
%p 本地am或者pm的相应符
%S 秒(01 - 61)
%U 一年中的星期数。(00 - 53星期天是一个星期的开始。)第一个星期天之前的所有天数都放在第0周。
%w 一个星期中的第几天(0 - 6,0是星期天)
%W 和%U基本相同,不同的是%W以星期一为一个星期的开始
%x 本地相应日期
%X 本地相应时间
%y 去掉世纪的年份(00 - 99)
%Y 完整的年份
%Z 时区的名字(如果不存在为空字符)
%% ‘%’字符
  • 附录3:time模块,时间之间的转换关系

序列化(Serialzation)将对象的状态信息转换为可以存储或传输的形式的过程叫做序列化。反之将读取到的文本信息转换为对象叫做反序列化。本篇文章介绍三种Python下序列化的方法

Python Version: 3.5+

json

json是当今最流行的序列化格式之一,拥有超轻量级的数据交换格式。由于json的跨平台,跨语言交换信息的特性,在json中的字符串必须使用双引号引起来,在有的语言中有明确的定义,单引号只能表示单个字符,所以在json中使用单引号会产生意想不到的效果~~

json可以转化的Python对象有:

  • list
  • dict

本篇文章主要介绍json的4个方法:

  • dumps() 直接操作Python的数据类型转换成json字符串
  • loads() 直接将json字符串转换为Python的数据类型
  • dump() 先将Python的数据类型转换成json字符串,再写入文件
  • load() 先从文件中读取json字符串,再装换为Python的数据类型

dumps()

将list或dict对象序列化成json格式的字符串

1
2
3
4
5
6
7
8
9
10
11
import json

d = {'k1': 'v1'}
print(d, type(d))

result = json.dumps(d)
print(result, type(result))

------------
{'k1': 'v1'} <class 'dict'>
{"k1": "v1"} <class 'str'>

注意:上面已经强调了,在json中的字符串必须使用双引号。在上面的小例子中,我在创建Python字典的时候使用了单引号,但是在序列化成json格式时,json自动帮我们换上了双引号。

loads()

将json格式的字符串反序列化成list或dict对象

1
2
3
4
5
6
7
8
9
10
11
import json

s = '{"k1": "v1"}'
print(s, type(s))

d = json.loads(s)
print(d, type(d))

------------
{"k1": "v1"} <class 'str'>
{'k1': 'v1'} <class 'dict'>

dump()

将list或dict对象转换为json格式的字符串并写入到文件中

1
2
3
4
5
6
7
8
9
10
11
import json

d = {'k1': 'v1'}
print(d, type(d))

result = json.dump(d, open('a.json', 'w'))
print(result, type(result))

------------
{'k1': 'v1'} <class 'dict'>
None <class 'NoneType'>

使用dump写入文件后,不再有返回值

cat a.json

1
{"k1": "v1"}

load()

将文件中json格式的字符串转化为Python的list或dict对象

1
2
3
4
5
6
7
import json

d = json.load(open('a.json', 'r'))
print(d, type(d))

------------
{'k1': 'v1'} <class 'dict'>

pickle

pickle是Python语言自己的序列化方式,其优点是可以序列化任何Python对象,不仅限于json的list和dict。我们说Python是面向对象语言,万物皆对象,那么对于pickle来说就是Python的万物皆可序列化。这既是它的优点,也是它的缺点,由于pickle是Python自己的序列化方式,它不支持与其他语言的信息交换。json可以跨语言进行信息交换,但是pickle不行,pickle只能在Python语言下进行信息的交换,而且Python的版本不同,对pickle来说可能还会有兼容性的问题。

本篇文章主要介绍pickle的4个方法:

  • dumps()
  • loads()
  • dump()
  • load()

dumps()

将任何Python对象转化成二进制字节类型

1
2
3
4
5
6
7
8
9
10
11
import pickle

class User(object):
pass

u = User()
ret = pickle.dumps(u)
print(ret, type(ret))

------------
b'\x80\x03c__main__\nUser\nq\x00)\x81q\x01.' <class 'bytes'>

loads()

将二进制字节类型的数据转化为Python对象

1
2
3
4
5
6
7
8
9
10
11
12
13
14
15
import pickle

class User(object):
pass

u = User()
ret = pickle.dumps(u)
print(ret, type(ret))

o = pickle.loads(ret)
print(o, type(o))

------------
b'\x80\x03c__main__\nUser\nq\x00)\x81q\x01.' <class 'bytes'>
<__main__.User object at 0x101b78a90> <class '__main__.User'>

dump()

将Python对象转化成二进制字节,再写入到文件

1
2
3
4
5
6
7
8
import pickle

u = (1, 2, 3)
ret = pickle.dump(u, open('a.pkl', 'wb'))
print(ret, type(ret))

------------
None <class 'NoneType'>

注意:由于pickle把对象转化成了二进制的字节,所以在写入文件的时候,一定要加上b

load()

读取文件中的二进制字节,将其转化为Python对象

1
2
3
4
5
6
7
import pickle

o = pickle.load(open('a.pkl', 'rb'))
print(o, type(o))

------------
(1, 2, 3) <class 'tuple'>

注意:读取的时候也要加上b

YAML

YAML格式是最近几年大红大紫的交换格式,作为运维,最直观的感觉就是从运维自动化概念的开始,到容器技术的普及,让YAML的使用频率一高再高。YAML拥有比json更高的可读性,尤其用在配置文件(如saltstack,docker描述文件等)在合适不过了!

本篇文章主要介绍YAML的两个方法:

  • dump()
  • load()

由于YAML绝大部分的是对文件来操作,所以这里介绍时调换一下顺序,先介绍load()

首先写一个YAML的配置文件出来conf.yml

1
2
3
4
5
6
7
8
9
10
11
12
13
14
15
16
17
18

host1:
IP: 192.168.1.1
app:
- httpd
- mysql
- php
memory: 16G

host2:
IP: 192.168.1.2
app:
- logstash
- kibana
- elasticsearch
- kafka
- zookeeper
memory: 128G

load()

1
2
3
4
5
6
7
import yaml

o = yaml.load(open('conf.yml'))
print(o, type(o))

------------
{'host1': {'app': ['httpd', 'mysql', 'php'], 'IP': '192.168.1.1', 'memory': '16G'}, 'host2': {'app': ['logstash', 'kibana', 'elasticsearch', 'kafka', 'zookeeper'], 'IP': '192.168.1.2', 'memory': '128G'}} <class 'dict'>

dump()

1
2
3
4
5
6
import yaml

o = yaml.load(open('conf.yml'))

o['host3'] = {'app': ['docker', 'jenkins'], 'IP': '192.168.1.3', 'memory': '64G'}
yaml.dump(o, open('conf.yml', 'w'))
1
2
3
4
5
6
7
8
9
10
11
12
host1:
IP: 192.168.1.1
app: [httpd, mysql, php]
memory: 16G
host2:
IP: 192.168.1.2
app: [logstash, kibana, elasticsearch, kafka, zookeeper]
memory: 128G
host3:
IP: 192.168.1.3
app: [docker, jenkins]
memory: 64G

可以使用default_flow_style=False来保证高可读性

1
2
3
4
5
6
7
import yaml

o = yaml.load(open('conf.yml'))

o['host3'] = {'app': ['docker', 'jenkins'], 'IP': '192.168.1.3', 'memory': '64G'}
#yaml.dump(o, open('conf.yml', 'w'))
yaml.dump(o, open('conf.yml', 'w'), default_flow_style=False)
1
2
3
4
5
6
7
8
9
10
11
12
13
14
15
16
17
18
19
20
21
22
host1:
IP: 192.168.1.1
app:
- httpd
- mysql
- php
memory: 16G
host2:
IP: 192.168.1.2
app:
- logstash
- kibana
- elasticsearch
- kafka
- zookeeper
memory: 128G
host3:
IP: 192.168.1.3
app:
- docker
- jenkins
memory: 64G

Python Version:3.5+

生成器

一个函数调用时返回一个迭代器(可迭代的对象),那这个函数就叫做生成器(generator);如果函数中包含yield语法,那这个函数就会变成生成器;

在函数中,有return语句,在执行函数的时候,一旦执行到return语句,函数会立即返回结果并退出函数;而如果使用了yield语句,当函数执行到yield时,会立即将yield后的值返回,并等待下一次调用。

形象点来说,return相当于按下了停止键;而yield相当于按下了暂停键。他们之间的区别就在于,暂停键是可以继续播放的,而停止了之后再播放需要从头播放。

感受一下生成器

1
2
3
4
5
6
7
8
9
10
11
12
13
14
15
16
17
18
19
20
21
22
23
24
def func():
yield 1
yield 2
yield 3
yield 4

f = func()

print(type(f))
print(f.__next__())
print(f.__next__())
print(f.__next__())
print(f.__next__())
print(f.__next__())

------------
1
2
3
4
Traceback (most recent call last):
File "/Users/lvrui/PycharmProjects/untitled/5/test.py", line 85, in <module>
print(f.__next__())
StopIteration

这里的f.__next__()就相当于“播放”键,每执行一次,都会让函数从上次停止的位置继续执行。函数中,定义了一共可以有四次暂停键,而我在调用时,按了五次播放键,到最后,抛出了StopIteration异常,说明该迭代对象已经遍历完毕。

实例:将列表进行拆分,例如[1, 2, 3]拆分成[1, 2] [2, 3]

1
2
3
4
5
6
7
8
9
10
11
12
13
14
15
16
17
18
19
def mylist(li):
for i in range(len(li) - 1):
yield (li[i], li[i + 1])

li = [1, 2, 3, 4, 5, 6]

generator_list = mylist(li)
print(generator_list)

for i in generator_list:
print(i)

------------
<generator object mylist at 0x101380888>
(1, 2)
(2, 3)
(3, 4)
(4, 5)
(5, 6)

迭代器

迭代器是访问集合元素的一种方式。迭代器对象从集合的第一个元素开始访问,直到所有的元素被访问完结束。迭代器只能往前不会后退,不过这也没什么,因为人们很少在迭代途中往后退。另外,迭代器的一大优点是不要求事先准备好整个迭代过程中所有的元素。迭代器仅仅在迭代到某个元素时才计算该元素,而在这之前或之后,元素可以不存在或者被销毁。这个特点使得它特别适合用于遍历一些巨大的或是无限的集合,比如几个G的文件

特点:

  • 访问者不需要关心迭代器内部的结构,仅需通过next()方法不断去取下一个内容
  • 不能随机访问集合中的某个值 ,只能从头到尾依次访问
  • 访问到一半时不能往回退
  • 便于循环比较大的数据集合,节省内存

如何判断是否是可迭代对象

1
2
3
4
5
>>> i = iter([1,2,3,4,5])
>>> i
<list_iterator object at 0x1032fa390>
>>> dir(i)
['__class__', '__delattr__', '__dir__', '__doc__', '__eq__', '__format__', '__ge__', '__getattribute__', '__gt__', '__hash__', '__init__', '__iter__', '__le__', '__length_hint__', '__lt__', '__ne__', '__new__', '__next__', '__reduce__', '__reduce_ex__', '__repr__', '__setattr__', '__setstate__', '__sizeof__', '__str__', '__subclasshook__']

一个对象中,同时拥有__iter__ __next__这两个方法的对象就是可迭代对象。

迭代对象靠什么迭代?靠__next__方法进行迭代。而Python中的for循环语句,内部帮我们调用了对象的__next__方法,而且帮我们自动捕获了StopIteration异常。So for循环就是Python中的迭代器

递归:程序执行过程中,调动自身的编程技巧称之为递归,如果你需要了解更多关于递归的说明,可以移步下面的链接查看百度百科。好吧,我们这里不谈递归的概念,只谈实现

百度百科:递归

在去实现递归之前,先来看一个小🌰例子:

1
2
3
4
5
6
7
8
9
10
11
12
13
14
15
16
def a():
print('Polar Snow')

def b():
return a()

def c():
return b()

def d():
return c()

d()

------------
Polar Snow

如代码所示,我执行了d(),但是在d的内部又执行了c(),在c的内部又执行了b(),在b的内部执行了a(),调用关系如下图所示:

执行d()的时候,先走红色线的调用,到a()后,走蓝色线的返回值,最后的print(r)实际上就是a()函数的返回值

递归

了解了上面的例子后,会更容易递归的实现,现有如下递归实例:

1
2
3
4
5
6
7
8
9
10
11
def func(n):
n += 1
if n >= 4:
return 'end'
return func(n)

r = func(1)
print(r)

------
end

红色的线是调用线,蓝色的线是返回线。可以看到,递归是逐层调用,当条件满足时结束调用自己,并逐层将值返回。上面的案例中,每层的值都是按照原值进行返回,在实际应用中,可以对每下一层返回的值进行计算后再返回给上一层。

思考题

  • 使用递归的方式计算:7的阶乘
1
2
3
4
5
6
7
8
9
def cal(n):
if n == 0:
return 1
return n * cal(n-1)

print(cal(7))

------------
5040

  • 使用递归的方式计算:1*2*3*4*5*6*7
1
2
3
4
5
6
7
8
9
def cal(n):
if n == 7:
return n
return n * cal(n+1)

print(cal(1))

------------
5040

总结:从以上两种对递归的使用来看,可以总结出,递归计算的两个关键点

  • return点:递归到第几层的时候开始返回,返回什么?
  • 计算点:当下一层的函数返回数据的时候,需要对数据做什么样的计算?

第一种计算阶乘的思路是传递一个最大值,让函数帮我从大往小乘。有了这个信息就确定了计算点的方式!是从大往小乘,大的值就是原参数的值,小的值是通过下一层计算得来的,所以就确定了计算点的表达式n * cal(n-1)。最后还需要确定递归的第一个返回值,也就是return点,既然是从大往小乘,return点就是最小值1,阶乘算到1就不用往下算了,所以在递归中加入判断,当值=1时,返回1.

第二种计算阶乘的思路是传递一个最小值,在递归内部,写死了计算到7的阶乘,递归到最深层的时候返回7到上一层,交给上一层的n * 7表达式来处理,由于函数中,每层的调用n都加了1,那么此时的n肯定是6,所以表达式会计算6 * 7,并将结果42返回给上一层。而再上一层的n肯定是5,所以又会去计算5 * 42并将结果返回至上层

Python中格式化字符串的方式有两种,一种是使用百分号的方式;一种是使用format方式。使用百分号的方式比较古老,而使用format则是比较“先进”的方式,目前两者并存

Python Version: 3.5+

百分号的方式格式化字符串

语法格式:

%[(name)][flags][width].[precision]typecode

在学习更多参数之前,我们先来回顾以下,使用百分号的最简单的用法,是怎么实现的

1
2
3
>>> s = 'My name is %s, I am %d.' % ('Polar Snow', 25)
>>> s
'My name is Polar Snow, I am 25.'

在这种多占位符的情况下,后面的括号中传入的是一个列表,根据索引,分别对应前面字符串占位符的第0个和第1个。

(name)

可选,用于选择指定的key

1
2
3
>>> s = 'My name is %(name)s, I am %(age)d.' % {'name': 'Polar Snow', 'age': 25}
>>> s
'My name is Polar Snow, I am 25.'

使用这种方式的好处是显而易见的,如果一长串字符串中有N多个占位符,极有可能无法保证一一对应,而且占位符多了,很容易记混第几个占位符是干嘛的。使用这种“字典”的方式,给每个占位符起名字,赋值的时候根据名字赋值,传递的位置不需要一一对应。

1
2
3
>>> s = 'My name is %(name)s, Hello %(name)s.' % {'name': 'Polar Snow'}
>>> s
'My name is Polar Snow, Hello Polar Snow.'

flags

可选,提供以下的值可以选择:

符号 对齐 说明
+ 右对齐 正数前加+,负数前加-
- 左对齐 正数前无符号,负数前加-
空格 右对齐 正数前加空格,负数前加-
0 右对齐 正数前无符号,负数前加-,用0填充空白处

对齐的特性需要width参数的支持

  • +
1
2
3
4
5
6
7
>>> s = 'My name is %(name)s, I am %(age)+d.' % {'name': 'Polar Snow', 'age': 25}
>>> s
'My name is Polar Snow, I am +25.'
------
>>> s = 'My name is %(name)s, I am %(age)+d.' % {'name': 'Polar Snow', 'age': -25}
>>> s
'My name is Polar Snow, I am -25.'
  • -
1
2
3
4
5
6
7
>>> s = 'My name is %(name)s, I am %(age)-d.' % {'name': 'Polar Snow', 'age': 25}
>>> s
'My name is Polar Snow, I am 25.'
------
>>> s = 'My name is %(name)s, I am %(age)-d.' % {'name': 'Polar Snow', 'age': -25}
>>> s
'My name is Polar Snow, I am -25.'
  • 空格
1
2
3
4
5
6
7
>>> s = 'My name is %(name)s, I am [%(age) d].' % {'name': 'Polar Snow', 'age': 25}
>>> s
'My name is Polar Snow, I am [ 25].'
------
>>> s = 'My name is %(name)s, I am [%(age) d].' % {'name': 'Polar Snow', 'age': -25}
>>> s
'My name is Polar Snow, I am [-25].'
  • 0
1
2
3
4
5
6
7
>>> s = 'My name is %(name)s, I am %(age)0d.' % {'name': 'Polar Snow', 'age': 25}
>>> s
'My name is Polar Snow, I am 25.'
------
>>> s = 'My name is %(name)s, I am %(age)0d.' % {'name': 'Polar Snow', 'age': -25}
>>> s
'My name is Polar Snow, I am -25.'

width

可选,占位符的宽度

1
2
3
4
5
6
7
>>> s = 'My name is %(name)s, I am [%(age)05d].' % {'name': 'Polar Snow', 'age': -25}
>>> s
'My name is Polar Snow, I am [-0025].'
------
>>> s = 'My name is %(name)s, I am [%(age)05d].' % {'name': 'Polar Snow', 'age': 25}
>>> s
'My name is Polar Snow, I am [00025].'

有个宽度的设置,上面的对齐才能看出效果

1
2
3
4
5
6
7
>>> s = 'My name is %(name)s, I am [%(age)+5d].' % {'name': 'Polar Snow', 'age': 25}
>>> s
'My name is Polar Snow, I am [ +25].'
------
>>> s = 'My name is %(name)s, I am [%(age) 5d].' % {'name': 'Polar Snow', 'age': 25}
>>> s
'My name is Polar Snow, I am [ 25].'

.precision

可选,小数点后保留的位数(还有四舍五入哦!)

1
2
3
>>> s = 'My name is %(name)s, I am [%(age) 9.3f].' % {'name': 'Polar Snow', 'age': 25.2525252525}
>>> s
'My name is Polar Snow, I am [ 25.253].'

typecode

  • s,获取传入对象的str方法的返回值,并将其格式化到指定位置
  • r,获取传入对象的repr方法的返回值,并将其格式化到指定位置
  • c,整数:将数字转换成其unicode对应的值,10进制范围为 0 <= i <= 1114111(py27则只支持0-255);字符:将字符添加到指定位置
  • o,将整数转换成 八 进制表示,并将其格式化到指定位置
  • x,将整数转换成十六进制表示,并将其格式化到指定位置
  • d,将整数、浮点数转换成 十 进制表示,并将其格式化到指定位置
  • e,将整数、浮点数转换成科学计数法,并将其格式化到指定位置(小写e)
  • E,将整数、浮点数转换成科学计数法,并将其格式化到指定位置(大写E)
  • f, 将整数、浮点数转换成浮点数表示,并将其格式化到指定位置(默认保留小数点后6位)
    F,同上
  • g,自动调整将整数、浮点数转换成 浮点型或科学计数法表示(超过6位数用科学计数法),并将其格式化到指定位置(如果是科学计数则是e;)
  • G,自动调整将整数、浮点数转换成 浮点型或科学计数法表示(超过6位数用科学计数法),并将其格式化到指定位置(如果是科学计数则是E;)
  • %,当字符串中存在格式化标志时,需要用 %%表示一个百分号

虽然上面列举辣么多字符类型,但是最常用的前面的例子中都已经使用过了!没错,就是s d f这三个货,特别提示一下,当你需要在字符串中打印%时,需要输入%%才能显示一个%


format方式格式化字符串

语法格式:

[[fill]align][sign][#][0][width][,][.precision][type]

使用format的最简单方式格式化字符串:

1
2
3
4
5
6
7
8
9
10
11
>>> s = 'My name is {}, I am {}.'.format('Polar Snow', 25.2525252525)
>>> s
'My name is Polar Snow, I am 25.2525252525.'
------
>>> s = 'My name is {}, I am {}.'.format('Polar Snow', 25)
>>> s
'My name is Polar Snow, I am 25.'
------
>>> s = 'My name is {name}, I am {age}.'.format(name='Polar Snow', age=25)
>>> s
'My name is Polar Snow, I am 25.'

在之前的Python笔记中,讲到参数的时候,提到过使用*args, **kwargs来当万能参数,包罗万象~ 而当参数为一个列表,而希望列表中的每一个元素去充当参数时,我们加上了*这个关键符号。区别就是如果传入参数的是一个列表,如果不加*,那么意味着整个列表是一个参数;而加上了*,则意味着将列表中的每一个元素取出充当参数。这个原理同样适用于字符串格式化,下面我们就用这种方法实现上面同样的效果。

1
2
3
4
5
6
7
>>> s = 'My name is {}, I am {}.'.format(*['Polar Snow', 25])
>>> s
'My name is Polar Snow, I am 25.'
------
>>> s = 'My name is {name}, I am {age}.'.format(**{'name': 'Polar Snow', 'age': 25})
>>> s
'My name is Polar Snow, I am 25.'

注意:只有format的方式支持加* **关键字符,使用%的方式不支持!

fill

可选,空白处填充的字符,需要配合width才能看出效果

align

可选,对齐方式,需要配合width才能看出效果

  • <,内容左对齐
  • ,内容右对齐(默认)

  • =,内容右对齐,将符号放置在填充字符的左侧,且只对数字类型有效。 即使:符号+填充物+数字
  • ^,内容居中

sign

可选,数字前的符号

  • +,正号加正,负号加负;
  • -,正号不变,负号加负;
  • 空格 ,正号空格,负号加负;

#

可选,对于二进制、八进制、十六进制,如果加上#,会显示 0b/0o/0x,否则不显示

,

可选,为数字添加分隔符,如:1,000,000

width

可选,格式化占位符所占的宽度

.precision

可选,小数位保留精度

type

可选,格式化类型

  • 传入” 字符串类型 “的参数
    • s,格式化字符串类型数据
    • 空白,未指定类型,则默认是None,同s
  • 传入“ 整数类型 ”的参数
    • b,将10进制整数自动转换成2进制表示然后格式化
    • c,将10进制整数自动转换为其对应的unicode字符
    • d,十进制整数
    • o,将10进制整数自动转换成8进制表示然后格式化;
    • x,将10进制整数自动转换成16进制表示然后格式化(小写x)
    • X,将10进制整数自动转换成16进制表示然后格式化(大写X)
  • 传入“ 浮点型或小数类型 ”的参数
    • e, 转换为科学计数法(小写e)表示,然后格式化;
    • E, 转换为科学计数法(大写E)表示,然后格式化;
    • f , 转换为浮点型(默认小数点后保留6位)表示,然后格式化;
    • F, 转换为浮点型(默认小数点后保留6位)表示,然后格式化;
    • g, 自动在e和f中切换
    • G, 自动在E和F中切换
    • %,显示百分比(默认显示小数点后6位)

format中常用的格式化

1
2
3
4
5
6
7
8
9
10
11
12
13
14
15
16
17
18
19
20
21
22
23
24
25
26
27
28
29
30
31
32
33
34
35
36
37
38
39
40
41
42
43
44
45
46
47
48
49
50
51
52
53
54
# 首先从最简单的开始
>>> s = 'My name is {}, I am {}.'.format('Polar Snow', 25)
>>> s
'My name is Polar Snow, I am 25.'
# 列表的形式传值
>>> s = 'My name is {}, I am {}.'.format(*['Polar Snow', 25])
>>> s
'My name is Polar Snow, I am 25.'
# 指定值列表的索引
>>> s = 'My name is {0}, I am {1}.'.format('Polar Snow', 25)
>>> s
'My name is Polar Snow, I am 25.'
>>> s = 'My name is {0}, I am {0}.'.format('Polar Snow', 25)
>>> s
'My name is Polar Snow, I am Polar Snow.'
# 甚至可以在嵌套中取值
>>> s = 'My name is {0[0]}, I am {0[1]}.'.format(['Polar Snow', 'Larry'], 25)
>>> s
'My name is Polar Snow, I am Larry.'
------
# 设置占位符名称
>>> s = 'My name is {name}, I am {age}.'.format(name='Polar Snow', age=25)
>>> s
'My name is Polar Snow, I am 25.'
# 字典的形式传值
>>> s = 'My name is {name}, I am {age}.'.format(**{'name': 'Polar Snow', 'age': 25})
>>> s
'My name is Polar Snow, I am 25.'
------
# format最省心的是不需要指定字符串类型,但是你也可以选择去指定
>>> s = "i am {:s}, age {:d}, money {:f}".format("seven", 25, 88888.1)
>>> s
'i am seven, age 25, money 88888.100000'
# 保留两位小数
>>> s = "i am {:s}, age {:d}, money {:.2f}".format("seven", 25, 88888.1)
>>> s
'i am seven, age 25, money 88888.10'
# 保留两位小数并在数字中用,分隔
>>> s = "i am {:s}, age {:d}, money {:,.2f}".format("seven", 25, 88888.1)
>>> s
'i am seven, age 25, money 88,888.10'
------
# 居中显示,插入[]是为了展示居中的效果更直观
>>> s = "i am {:s}, age [{:^10d}], money {:,.2f}".format("seven", 25, 88888.1)
>>> s
'i am seven, age [ 25 ], money 88,888.10'
------
# 数字的展示
>>> s = "numbers: {0:b},{0:o},{0:d},{0:x},{0:X}, {0:%}".format(15)
>>> s
'numbers: 1111,17,15,f,F, 1500.000000%'
>>> s = "numbers: {num:b},{num:o},{num:d},{num:x},{num:X}, {num:%}".format(num=15)
>>> s
'numbers: 1111,17,15,f,F, 1500.000000%'

如果以上这些还不能满足你的需求,请移步Python官方文档:Python Docs 4 String Format

abs(x)

abs函数用来返回参数的绝对值

1
2
>>> abs(-59)
59

all(iterable)

all函数接收一个可迭代的对象作为参数,所有元素均为真则返回真

1
2
3
4
5
6
7
8
9
10
l1 = [1, '1', True]
print(all(l1))

l2 = [0, '1', True]
print(all(l2))

------------
True
False
#0为假,可迭代对象中只要全为真才返回为真

相当于做了如下操作:

1
2
3
4
5
def all(iterable):
for element in iterable:
if not element:
return False
return True

any(iterable)

any函数接收一个可迭代的对象作为参数,只要有一个元素为真即返回为真

1
2
3
4
5
6
7
8
9
10
11
12
13
l1 = [1, '1', True]
print(any(l1))

l2 = [0, '1', True]
print(any(l2))

l3 = [0, '', False]
print(any(l3))

-----------
True
True
False

相当于做了如下操作:

1
2
3
4
5
def any(iterable):
for element in iterable:
if element:
return True
return False

all(iterable) 与 any(iterable) 的区别

  • all(iterable) 可迭代的参数对象中,只要有一个值为假,则立即返回False,所有值都为真才返回为True
  • any(iterable) 可迭代的参数对象中,只要有一个值为真,则立即返回True,所有值都为假才返回False

ascii(object)

ascii 自动执行对象的__repr__方法

这个函数跟repr()函数一样,返回一个可打印的对象字符串方式表示。

当遇到非ASCII码时,就会输出\x \u\U等字符来表示。

与Python 2版本里的repr()是等效的函数

1
2
3
4
5
6
7
8
class c():
def __repr__(self):
return 'repr'

print(ascii(c()))

------------
repr
1
2
3
4
>>> ascii('极地瑞雪')
"'\\u6781\\u5730\\u745e\\u96ea'"
>>> ascii('Polar Snow')
"'Polar Snow'"

repr(object)

而repr(object)转化为供解释器读取的字符串形式

1
2
3
4
>>> repr('极地瑞雪')
"'极地瑞雪'"
>>> repr('Polar Snow')
"'Polar Snow'"

str(object=’’)

class str(object=b’’, encoding=’utf-8’, errors=’strict’)

函数str(object=’’)用于将值转化为适于阅读的字符串形式

1
2
3
4
>>> str('极地瑞雪')
'极地瑞雪'
>>> str('Polar Snow')
'Polar Snow'

ascii(object) 与 repr(object) 的区别

两者的作用都是将对象转化为字符串

  • ascii()方法返回的字符串为非ascii码能表示的字符时,使用\x, \u or \U来表示
  • repr()方法返回对Python解释器友好的字符串格式
1
2
3
4
5
6
7
8
9
10
11
12
13
>>> ascii('极地瑞雪')
"'\\u6781\\u5730\\u745e\\u96ea'"
>>> ascii('Polar Snow')
"'Polar Snow'"
>>> ascii(59)
'59'
------------
>>> repr('极地瑞雪')
"'极地瑞雪'"
>>> repr('Polar Snow')
>>> "'Polar Snow'"
>>> repr(59)
'59'

repr(object) 与 str(object=’’) 的区别

两者的作用都是将对象转化为字符串

  • repr()方法返回对Python解释器友好的字符串格式
  • str()方法返回对人阅读友好的字符串格式
1
2
3
4
5
6
7
8
9
10
11
12
13
>>> repr('极地瑞雪')
"'极地瑞雪'"
>>> repr('Polar Snow')
>>> "'Polar Snow'"
>>> repr(59)
'59'
------------
>>> str('极地瑞雪')
'极地瑞雪'
>>> str('Polar Snow')
'Polar Snow'
>>> str(59)
'59'

bin(x)

bin(x) 接收一个十进制,返回二进制 0b

1
2
>>> bin(59)
'0b111011'

oct(x)

oct(x) 接收一个十进制,返回八进制 0o

1
2
>>> oct(59)
'0o73'

hex(x)

hex(x) 接收一个十进制,返回十六进制 0x

1
2
>>> hex(59)
'0x3b'

bool([x])

bool([x]) 判断元素真假, 以下元素为常出现的假元素:

  • 0
  • ‘’
  • []
  • ()
  • {}
  • set()
  • False

bytes

betes() 把指定的字符串转换为字节类型

1
2
3
4
5
6
7
8
9
>>> bytes('极地瑞雪', encoding='utf-8')
b'\xe6\x9e\x81\xe5\x9c\xb0\xe7\x91\x9e\xe9\x9b\xaa'
>>> str(b'\xe6\x9e\x81\xe5\x9c\xb0\xe7\x91\x9e\xe9\x9b\xaa', encoding='utf-8')
'极地瑞雪'
------------
>>> bytes('极地瑞雪', encoding='gbk')
b'\xbc\xab\xb5\xd8\xc8\xf0\xd1\xa9'
>>> str(b'\xbc\xab\xb5\xd8\xc8\xf0\xd1\xa9', encoding='gbk')
'极地瑞雪'

一个汉字使用utf-8编码的话占用三个字节,使用gbk编码的话占用两个字节

  • 打开文件乱码实况再现:
1
2
3
4
5
6
u = bytes('吕瑞', encoding='utf-8')
s = str(u, encoding='gbk')
print(s)

######运行结果
鍚曠憺

如果一个文件是以utf-8的编码方式保存,每三个字节是一个汉字,再同样以utf-8的方式读取,会正确的按照3个字节一个汉字去读取文件,而如果以gbk的方式读取文件,会按照两个字节一个汉字的方式读取,所以会产生乱码的情况

1
2
3
4
5
6
                        极地瑞雪(UTF-8)
二进制: 11100110 10011110 10000001 11100101 10011100 10110000 11100111 10010001 10011110 11101001 10011011 10101010
十进制: 230 158 129 229 156 176 231 145 158 233 155 170
十六进制: e6 9e 81 e5 9c b0 e7 91 9e e9 9b aa

注意:二进制的表现形式为字节
  • 用香来表示精确数字的小故事(二进制转十进制)
1
2
3
4
5
6
7
8
9
10
11
12
13
14
15
16
17
18
19
20
21
22
23
24
25
26
27
28
29
30
31
32
33
34
35
36
37
38
39
40
41
42
43
44
45
46
47
48
49
50
51
52
53
54
55
56
57
58
59
60
61
62
63
64
65
66
67
68
69
70
71
72
73
74
75
76
77
78
79
80
81
82
83
84
85
86
87
88
89
90
一支香有两种状态,点燃的情况和熄灭的情况
现在定义:香熄灭[I]的状态表示0,点燃[i]的情况表示为1
0: 那么我现在要表示0,很简单,一支香足够,熄灭就行了--[I]
0
1: 一支香足够,点燃即可--[i]
1
2: 一支香最多只能表示到1,如果要表示2,需要在前面加一支香来表示2,这样我只需点燃头一支香即可表示2--[iI]
10
3: 两支香的话,第一支表示2,第一支最多表示1,只需将第二支点燃即可表示3--[ii]
11
4: 两支香最大可表示到3,现在需要加第三支香来表示4--[iII]
100
5: 以此类推--[iIi]
101


关系图:
最大表示:1
0: [I]
状态:0
-------------------
最大表示:1
1: [i]
状态:1
-------------------
最大表示:2 1
2: [i I]
状态:1 0
-------------------
最大表示:2 1
3: [i i]
状态:1 1
-------------------
最大表示:4 2 1
4: [i I I]
状态:1 0 0
-------------------
最大表示:4 2 1
5: [i I i]
状态:1 0 1
-------------------
最大表示:4 2 1
6: [i i I]
状态:1 1 0
-------------------
最大表示:4 2 1
7: [i i i]
状态:1 1 1
-------------------
最大表示:8 4 2 1
8: [i I I I]
状态:1 0 0 0
-------------------
最大表示:8 4 2 1
9: [i I I i]
状态:1 0 0 1
-------------------
最大表示:8 4 2 1
10: [i I i I]
状态:1 0 1 0
-------------------
最大表示:8 4 2 1
11: [i I i i]
状态:1 0 1 1
-------------------
最大表示:8 4 2 1
12: [i i I I]
状态:1 1 0 0
-------------------
最大表示:8 4 2 1
13: [i i I i]
状态:1 1 0 1
-------------------
最大表示:8 4 2 1
14: [i i i I]
状态:1 1 1 0
-------------------
最大表示:8 4 2 1
15: [i i i i]
状态:1 1 1 1
-------------------
最大表示:16 8 4 2 1
16: [i I I I I]
状态:1 0 0 0 0
-------------------
……以此类推
从2开始,每翻一番就多一支香来表示
4(2支),8(3支),16(4支)都增加了一支香类表示
32(5支),64(6支),128(7支),256(8支),512(9支),1024(10支)
也可以把"支"换成"2的x次方"--> 2的10次方=1024

callable(object)

callable(object) 检查对象是否可以被执行调用

1
2
3
4
5
6
7
8
9
10
11
12
13
def f1():
pass
# f1()

f2 = 123
# f2()

print(callable(f1))
print(callable(f2))

------------
True
False

chr(i)

chr(i) 将数字转换为字符

Python3中,chr() 不仅包含ascii的对照表,还包含了Unicode对照表

1
2
3
4
5
6
>>> chr(59)
';'
>>> chr(8364)
'€'
>>> chr(201559)
'\U00031357'

classmethod(function)

classmethod(function) 是一个装饰器函数,一般会使用@classmethod的方式来调用,用来表示下面的方法是类方法

1
2
3
class C:
@classmethod
def f(cls, arg1, arg2, ...): ...

代码实例:参考自Pythontab

1
2
3
4
5
6
7
8
9
10
11
12
13
14
15
16
17
18
19
20
21
>>> class C:
... @classmethod
... def f(cls):
... print "This is a class method"
...
>>> C.f()
This is a class method
>>> c = C()
>>> c.f()
This is a class method
>>> class D:
... def f(self):
... print " This is not a class method "
...
>>> D.f()
Traceback (most recent call last):
File "<stdin>", line 1, in <module>
TypeError: unbound method f() must be called with D instance as first argument (got nothing instead)
>>> d = D()
>>> d.f()
This is not a class method

staticmethod(function)

staticmethod(function) 是一个装饰器函数, 一般会使用@staticmethod的方式来调用,用来表示下面的方法的静态方法

1
2
3
class C:
@staticmethod
def f(arg1, arg2, ...): ...

classmethod(function) / staticmethod(function) 和实例方法的区别

实例的方法针对的是具体某一实例化对象的方法;类方法针对的是某一类的方法;静态方法可以与类或实例化无关

  • 类方法:
    • 类方法的第一个参数是class
    • 类方法可以通过类直接调用,不需要传递实例的引用
    • 默认将该class对象(不是class实例化对象)隐式的传递给方法
  • 静态方法:
    • 静态方法可以认为是全局函数
    • 静态方法可以用类调用,也可以用对象调用
    • 不会隐式的传入任何参数
  • 实例方法:
    • 实例方法的第一个参数是self
    • 实例方法必须通过实例化的对象去调用(Python3可以传递任意对象,Python2中会报错)
    • 默认将该实例化对象隐式的传递给方法
1
2
3
4
5
6
7
8
9
10
11
12
13
14
15
16
17
18
19
20
21
22
23
24
25
26
27
28
29
30
31
32
33
34
class Foo(object):
def test(self): #定义了实例方法
print("object")
@classmethod
def test2(clss): #定义了类方法
print("class")
@staticmethod
def test3(): #定义了静态方法
print("static")

# 实例方法的调用方式
# 第一种方式,先生成对象(先实例化)再调用
f1 = Foo()
f1.test()
# 第二种方式,自己传递实例的引用
Foo.test(f1)

# 类方法的调用方式
# 可以直接使用类来调用,不需要传递实例的引用
Foo.test2()

# 静态方法的调用方式
# 第一种方式,使用实例化对象来调用静态方法
f3 = Foo()
f3.test3()
# 第二种方式,使用类来调用静态方法
Foo.test3()

------------
object
object
class
static
static

代码实例:参考自ITEYE

1
2
3
4
5
6
7
8
9
10
11
12
13
14
15
16
17
18
19
20
21
22
23
24
25
26
27
28
29
30
31
32
33
34
35
36
37
38
39
40
41
42
43
44
45
46
47
48
49
50
51
52
53
54
55
56
57
58
59
60
61
62
63
64
65
66
67
class Person:  

def __init__(self):
print "init"

@staticmethod
def sayHello(hello):
if not hello:
hello='hello'
print "i will sya %s" %hello


@classmethod
def introduce(clazz,hello):
clazz.sayHello(hello)
print "from introduce method"

def hello(self,hello):
self.sayHello(hello)
print "from hello method"


def main():
Person.sayHello("haha")
Person.introduce("hello world!")
#Person.hello("self.hello") #TypeError: unbound method hello() must be called with Person instance as first argument (got str instance instead)

print "*" * 20
p = Person()
p.sayHello("haha")
p.introduce("hello world!")
p.hello("self.hello")

if __name__=='__main__':
main()

------------
i will sya haha
i will sya hello world!
from introduce method
********************
init
i will sya haha
i will sya hello world!
from introduce method
i will sya self.hello
from hello method
```

---

# compile(source, filename, mode, flags=0, dont_inherit=False, optimize=-1)

compile(source, filename, mode, flags=0, dont_inherit=False, optimize=-1) 把字符串编译成Pythontab代码,编译后可以通过`eval()`或`exec()`来执行

```python
s = "print(123)"

# 编译,single,eval,exec
# 将字符串编译成python代码
r = compile(s, "<string>", "exec")

# 执行python代码
exec(r)

------------
123

print(123)'print(123)'的区别是,前者可以被Python解释器自动编译执行,而后者只是个字符串而已。如果想让后面的字符串去单过Python的命令的去执行,第一步就是先手动将该字符串进行编译,编译后的对象保存在内存中,可以被eval()exec()来执行

mode参数有三个:

  • single: 执行单条语句 —> exec()
  • exec: 可以执行多条语句 —> exec()
  • evel: 进行表达式计算 —> evel()

eval(expression, globals=None, locals=None)

eval(expression, globals=None, locals=None) 执行参数中的表达式并返回结果

1
2
3
>>> x = 1
>>> eval('x+1')
2

eval() 函数同样可以处理compile()函数生成的对象

1
2
3
4
5
6
7
8
9
print(eval('5 * 9'))

s = '5 * 9'
ret = compile(s, "<string>", 'eval')
print(eval(ret))

------------
45
45

exec(object[, globals[, locals]])

exec(object[, globals[, locals]]) 执行参数中的命令,返回值为None(区别于eval,eval是计算,计算就需要有返回值返回计算结果)

1
2
3
4
5
ret = exec('print(123)')
print(ret)

------------
None

exec() 函数处理compile()函数生成的对象—mod:single—处理单行命令

1
2
3
4
5
6
7
s = 'print(123)'
ret = compile(s, "<string>", 'single')
print(exec(ret)) #返回值为None

------------
123
None

exec() 函数处理compile()函数生成的对象—mod:single—处理多行命令

1
2
3
4
5
6
7
8
9
10
11
12
13
s = 'for i in range(5): print(i)'
ret = compile(s, "<string>", 'single')
print(exec(ret))

------------
Traceback (most recent call last):
File "/Users/lvrui/PycharmProjects/untitled/4/test.py", line 43, in <module>
ret = compile(s, "<string>", 'single')
File "<string>", line 1
for i in range(5): print(i)
^
SyntaxError: unexpected EOF while parsing
# single 模式无法处理多行命令,应该使用 exec模式

exec() 函数处理compile()函数生成的对象—mod:exec—处理多行命令

1
2
3
4
5
6
7
8
9
10
11
s = 'for i in range(5): print(i)'
ret = compile(s, "<string>", 'exec')
print(exec(ret)) #返回值为None

------------
0
1
2
3
4
None

代码实例:参考Pythoner

1
2
3
4
5
6
7
8
9
10
11
12
13
14
15
16
17
18
19
20
21
22
>>> eval_code = compile( '1+2', '', 'eval')
>>> eval_code
<code object <module> at 0142ABF0, file "", line 1>
>>> eval(eval_code)
3

>>> single_code = compile( 'print "pythoner.com"', '', 'single' )
>>> single_code
<code object <module> at 01C68848, file "", line 1>
>>> exec(single_code)
pythoner.com

>>> exec_code = compile( """for i in range(5):
... print "iter time: %d" % i""", '', 'exec' )
>>> exec_code
<code object <module> at 01C68968, file "", line 1>
>>> exec(exec_code)
iter time: 0
iter time: 1
iter time: 2
iter time: 3
iter time: 4

Python反射相关

  • delattr()
  • hasattr()
  • getattr()
  • setattr()
  • __import__()

详细介绍请点击这里查看

未整理完的内建函数

  1. bytearray()
  2. complex()
  3. dict()
  4. dir()
  5. divmod()
  6. enumerate()
  7. filter()
  8. float()
  9. format()
  10. frozenset()
  11. globals()
  12. hash()
  13. help()
  14. id()
  15. input()
  16. int()
  17. isinstance()
  18. issubclass()
  19. iter()
  20. len()
  21. list()
  22. locals()
  23. map()
  24. max()
  25. memoryview()
  26. min()
  27. next()
  28. object()
  29. open()
  30. pow()
  31. print()
  32. property()
  33. range()
  34. reversed()
  35. round()
  36. set()
  37. slice()
  38. sorted()
  39. sum()
  40. super()
  41. tuple()
  42. type()
  43. vars()
  44. zip()

Kubernetes是谷歌开源的一款大规模容器管理平台,在介绍这一平台之前,先跟大家讨论一下这个单词的读法!实际上,这个单词你在英文词典上根本查不着,因为它不是一个“英文单词”,Kubernetes,古希腊语是舵手的意思,是Cyber的词源。根据其拼写,我习惯称呼它为“k8s”

国内哪些公司在大规模的使用Kubernetes

  • 滴滴

  • 网宿

Kubernetes是什么

Kubernetes是Google开源的容器集群管理系统。它构建在Docker之上,为容器话的应用提供资源调度、部署运行、服务发现、扩容缩容等一整套功能,本质上可以看做是基于容器技术的Micro-PaaS平台,是第三代PaaS技术的代表之作。

Google从2004年开始就已经开始在使用容器技术了,于2006年发布了Cgroup,而且内部开发的强大的集群资源管理平台Borg和Omega,这些都已经广泛用在Google的各个基础设施中,而Kubernetes得灵感来源于Google内部的Borg系统,更是吸收了包括Omega在内的容器管理器的经验和教训。

Kubernetes有着以下优秀的特性:

  • 强大的容器编排能力

    Kubernetes可以说是同Docker一起发展起来的,深度集成了Docker,天然适应容器的特点,设计出强大的容器编排能力,比如容器组合、标签选择和服务发现等,可以满足企业级的需求

  • 轻量级

    Kubernetes遵循微服务架构理论,整个系统划分出各个功能独立的组件,组件之间边界清晰,部署简单,可以轻易地运行在各种系统和环境中。同时Kubernetes中的许多功能都实现了插件化,可以非常方便地进行扩展和替换。

  • 开放 开源

    Kubernetes顺应了开放开源的趋势,吸引了大批开发者和公司参与其中,协同工作,共同构建生态圈。同时,Kubernetes同Openstack、Docker等开源社区积极合作、共同发展

Kubernetes的发展史

Kubernetes自推出之后就迅速获得极高的关注与参与,2015年7月经过400多位贡献者一年的努力,多达14000次代码的提交,Google正式对外发布了Kubernetes v1.0,意味着这个开源容器编排系统可以正式在生产环境中使用。

  • 2014年6月:谷歌宣布Kubernetes开源

  • 2014年7月:MicroSoft、RedHat、IBM、Docker、CoreOS、Mesosphere、Saltstack加入到Kubernetes社区

  • 2014年8月:Mesosphere宣布将Kubernetes作为框架整合到Mesosphere生态系统中,用于Docker容器集群的调度、部署和管理

  • 2014年8月:VMware加入Kubernetes社区

  • 2014年11月:HP加入Kubernetes社区

  • 2014年11月:Google容器引擎Alpha启动

  • 2015年1月:Kubernetes被引入到Openstack

  • 2015年4月:Google和CoreOS联合发布Tectonic,它将Kubernetes和CoreOS软件栈整合到了一起

  • 2015年5月:Intel加入到Kubernetes社区

  • 2015年6月:Google容器进入到beta版

  • 2015年7月:Kubernetes v1.0版本正式发布

Kubernetes的核心概念

Pod

Pod是若干相关容器的组合,Pod包含的容器运行在同一台宿主机上,这些容器使用相同的网络命名空间、IP地址和端口,相互之间能通过localhost来发现和通信。这些容器还可以共享一块存储卷空间。在Kubernetes中创建、调度和管理的最小单元就是Pod,而不是容器,Pod通过更高层次的抽象,提供了更加灵活的部署和管理模式。

Replication Controller

Replication Controller用来控制管理Pod副本,它确保任何时候Kubernetes集群中有指定数量的Pod副本在运行。如果少于指定数量的Pod副本,它会启动新的Pod副本,反之它会杀死多余的副本以保证数量不变。而且,Replication Controller是弹性伸缩、滚动升级的实现核心

Service

Service是真实应用服务的抽象,定义了Pod的逻辑集合和访问这个Pod集合的策略。Service将代理Pod对外表现为一个单一的访问接口,外部不需要了解后端Pod是如何运行的,这给扩展和维护带来很多好处,提供了一套简化的服务代理和发现机制

Label

Label是用于区分Pod、Service、Replication Controller和Key/Value对,实际上,Kubernetes中的任意API对象都可以通过Label进行标识。每个API对象可以有多个Label,但是每个Label的Key只能对应一个Value。Label是Service和Replication Controller运行的基础,他们都通过Label来关联Pod,相比于强绑定模型,这是一种非常好的松耦合关系。

Node

Kubernetes属于主从分布式集群架构,Kubernetes Node运行并管理容器。Node作为Kubernetes的操作单元,用来分配给Pod进行绑定,Pod最终运行在Node上,Node可以认为是Pod的宿主机


在接下来的章节中,我将以《Kubernetes的官方文档》以及《Kubernetes实战》为依据,跟大家分享Kubernetes的架构、部署和应用

Kubernetes官方网站:http://kubernetes.io

本篇文章讨论Python的装饰器,Python装饰器帮助我们在不改变函数内部结构的情况下,对函数功能进行扩展,接下来进入正题,在讨论装饰器之前,先拿函数定义的原理抛砖引玉

Python version: 3.5+

函数定义的原理

在Python中通过def fun_name(): pass来定义一个函数。那么在这个小函数中,fun_name是函数的名字,pass是函数体。我们通常会说,Python在解释代码时,会把pass函数体放在内存中,并在内存中用fun_name去指向pass函数体。

话是这么说没错,但对于初学者来说,同样都是放在内存中,为啥还要指来指去的呢?具体来说,函数名在内存存放的地区是栈区,函数体在内存中存放的地区是堆区,存在栈区的函数名会指向存在堆区的函数体。在前面的Python学习笔记中,提到的两大数据类型的分类,一个是基本数据类型,一个是引用数据类型,所有的引用数据类型的名字都是压在了栈区,其对应的对象,都是存在了堆区。所以关于指向的问题,并不在内存中胡乱去指的~~

装饰器

装饰器前传

现有如下程序猿代码:

1
2
3
4
5
6
7
8
def f1():
print('f1 func')

def f2():
print('f2 func')

def f3():
print('f3 func')

现在老板需求是:在打印输出前,先输出loading...

于是程序猿做出如下修改:

1
2
3
4
5
6
7
8
9
10
11
def f1():
print('loading...')
print('f1 func')

def f2():
print('loading...')
print('f2 func')

def f3():
print('loading...')
print('f3 func')

老板觉得,打印输入后输出Done更好

于是程序猿又去修改代码了~~

1
2
3
4
5
6
7
8
9
10
11
12
13
14
def f1():
print('loading...')
print('f1 func')
print('Done')

def f2():
print('loading...')
print('f2 func')
print('Done')

def f3():
print('loading...')
print('f3 func')
print('Done')

之后老板又觉得……


有了装饰器后

还是上面的代码:

1
2
3
4
5
6
7
8
def f1():
print('f1 func')

def f2():
print('f2 func')

def f3():
print('f3 func')

如果使用了装饰器实现loading的需求:

1
2
3
4
5
6
7
8
9
10
11
12
13
14
15
16
17
def outer(func):
def inner():
print('loading...')
func()
return inner

@outer
def f1():
print('f1 func')

@outer
def f2():
print('f2 func')

@outer
def f3():
print('f3 func')

使用装饰器实现Done的需求:

1
2
3
4
5
6
7
8
9
10
11
12
13
14
15
16
17
18
def outer(func):
def inner():
print('loading...')
func()
print('Done')
return inner

@outer
def f1():
print('f1 func')

@outer
def f2():
print('f2 func')

@outer
def f3():
print('f3 func')

从上面简单的例子可以看出,使用装饰器可以在不改变原函数的情况下,对原函数的功能进行扩展!

装饰器预热

在详解装饰器前,我们还需要强调一个很重要的概念,就是函数的调用!

函数怎么调用?函数名后面跟了小括号就是调用,不加括号就不调用!

重要的事情说三遍!!!

  1. 函数名后面跟了小括号就是调用,不加括号就不调用!
  2. 函数名后面跟了小括号就是调用,不加括号就不调用!
  3. 函数名后面跟了小括号就是调用,不加括号就不调用!
1
2
3
4
5
6
7
def func():
print('我被调用了')

func()

------------
我被调用了
1
2
3
4
5
6
def func():
print('我被调用了')

func

------------

下面的小程序只写了函数名,后没有跟括号,该函数被加载到内存,但是没有被调用!在学习装饰器之前,一定要清楚什么时候加括号什么时候不加括号

装饰器解析

装饰器的创建

创建装饰器,最少需要嵌套一层函数,且在内层函数加载到内存之后返回内存函数

装饰器的使用

使用装饰器的方法很简单,只需要在被装饰的函数上面用@符号引用装饰器名即可

装饰器的功能

装饰器有两大功能:

  • 自动执行装饰器函数,且将下面的函数名当做参数传递给装饰器函数
  • 将装饰器函数的返回值,重新赋值给函数

第一大功能,当Python在遇到@装饰器名时,会去执行该装饰器;我们来说说第二大功能,装饰器函数的返回值会重新赋值给函数!

所有装饰器函数的返回值都是其内层函数,也就是说,内层函数会重新赋值给原函数。说到这里时,就需要引入开篇提到的函数定义原理,下面我们假设程序调用了f1().我们来看看在Python的内部都发生了什么。

1
2
3
4
5
6
7
8
9
10
11
12
13
14
15
16
17
18
19
20
21
22
23
24
25
def outer(func):
def inner():
print('loading...')
func()
print('Done')
return inner

@outer
def f1():
print('f1 func')

@outer
def f2():
print('f2 func')

@outer
def f3():
print('f3 func')

f1()

------------
loading...
f1 func
Done
  1. 在该程序中,f1的函数被outer装饰器所装饰
  2. Python在从上至下解释代码时,先将outer装饰器加载到内存中
  3. 当执行到@outer时,触发了Python装饰器的第一大功能,他将帮助我们去执行装饰器函数,上一条,outer装饰器已经加载到内存,还没有被调用执行。遇到@outer后,会触发outer()操作,当outer函数被执行后,其内层函数将被加载到内存中等待调用,outer的最后,返回了内层inner函数
  4. 装饰器外层函数的调用返回内层函数后,触发了Python装饰器的第二大功能,他将自动帮我们把返回的内存的函数重新赋值给被装饰的函数f1
  5. 最后,当f1被调用时,实际指向的是inner函数的函数体,也就是说,当f1函数被装饰器所装饰后,调用时所运行的函数体,实际上是装饰器函数中的内层函数。

如果上面的文字描述你还没有看懂的话,没关系,下面还有图文并茂的~

  • Python解释器从上至下解释,先将outer这个函数名字放入栈区,outer的整个函数体将被完整的加载到内存的堆区中,内存状态如下:

  • 接下来,Python解释器遇到@outer时,Python内部控制将去自动将下一行函数的名字(f1)作为参数传入到outer装饰器函数中,并自动执行outer函数,此时outer函数的形式参数func在栈区指向了堆区的f1函数体,内存状态如下:

  • outer函数执行完后,会将内层函数的返回值重新复制给原函数(f1)想当于执行了f1 = outer(f1)

  • 最后,当f1被被调用时,可以通过上图看出,实际调用的是装饰的内层函数,而装饰器中的内存函数体里又引用了原f1的函数体(已经将f1函数体堆区地址引用给了栈区的func)

总结:通过上面剖析的小例子可以看出,虽然print('f1 func')是f1的函数体,但是f1只有一瞬间拥有该函数体。在遇到@outer之后,f1就被当做参数传递给了outer装饰器,func与f1同时指向放在堆区的函数体。在outer函数执行后,内层函数被重新赋值给了f1,此时f1失去了对原函数体的控制而指向了inner的堆区地址,func独自控制了print('f1 func')该函数体。


原函数有返回值的装饰器

现在我的基础函数有返回值的需求,改成了如下代码:

1
2
3
4
5
6
7
8
9
10
11
def f1():
print('f1 func')
return True

def f2():
print('f2 func')
return True

def f3():
print('f3 func')
return True

如果是这样的函数被装饰,函数体中不仅有计算和输出,而且有返回值,那么我们就需要在装饰器中,接收原函数的返回值,并进行返回:

1
2
3
4
5
6
7
8
9
10
11
12
13
14
15
16
17
18
19
20
21
22
23
24
25
26
27
28
29
30
31
32
def outer(func):
def inner():
print('loading...')
ret = func() # 因为原函数有返回值,在这里调用时去接收原函数的返回值
print('Done')
return ret # 在新函数的结尾,返回原函数的返回值
return inner


@outer
def f1():
print('f1 func')
return True


@outer
def f2():
print('f2 func')
return True


@outer
def f3():
print('f3 func')
return True

f1()

------------
loading...
f1 func
Done

带参数的函数被装饰(参数个数确定)

现在我的代码变成了带参数的函数,如下:

1
2
3
4
5
6
7
8
9
10
11
12
13
def f1(arg1):
print('f1 func')
return True


def f2(arg1):
print('f2 func')
return True


def f3(arg1):
print('f3 func')
return True

相应的,我的装饰器也应该做出改变。想想上面装饰器的原理—>装饰器的内层函数被返回并重新赋值给原函数 也就是说,如果原函数有参数的话,相对应的,装饰器中的内层函数也应该有参数,故做出如下修改:

1
2
3
4
5
6
7
8
9
10
11
12
13
14
15
16
17
18
19
20
21
22
23
24
25
26
27
28
29
30
31
32
def outer(func):
def inner(arg):
print('loading...')
ret = func(arg)
print('Done')
return ret
return inner


@outer
def f1(arg1):
print('f1 func' + arg1)
return True


@outer
def f2(arg1):
print('f2 func' + arg1)
return True


@outer
def f3(arg1):
print('f3 func' + arg1)
return True

f1('123')

------------
loading...
f1 func123
Done

带参数的函数被装饰(参数个数不确定)

上面的例子中,在装饰器的内层函数加入参数,解决了被装饰函数带参数的问题,那么,如果被装饰的函数如果参数不确定,如何保证装饰器仍然可用呢?参考如下代码:

1
2
3
4
5
6
7
8
9
10
11
12
13
14
15
16
17
18
19
20
21
22
23
24
25
26
27
28
29
30
31
32
def outer(func):
def inner(*args, **kwargs):
print('loading...')
ret = func(*args, **kwargs)
print('Done')
return ret
return inner


@outer
def f1(arg1):
print('f1 func' + arg1)
return True


@outer
def f2(arg1, arg2):
print('f2 func' + arg1 + arg2)
return True


@outer
def f3(arg1, arg2, arg3):
print('f3 func' + arg1 + arg2 + arg3)
return True

f1('123')

------------
loading...
f1 func123
Done

好的,至此Python装饰器的常用用法就已经介绍完了,以上装饰器的知识足够解决Pythoner 80%的装饰问题啦,如果你有更高更复杂的需求,可以参考以下装饰器的用法


带参数的装饰器

应用场景:上面的装饰器,前篇一律,类似于Java中的工厂方法模式,各类对象,不管你是方的圆的三角的,一进工厂,出来都是一个模样的~~ 那带参数的装饰器要解决的就是“个性化工厂方法”的功能。虽然都会进装饰器的“熔炉”,但是通过给装饰器传递的不同参数,可以实现对每个函数的个性化装饰

1
2
3
4
5
6
7
8
9
10
11
12
13
14
15
16
17
18
19
20
21
22
23
24
25
26
27
28
29
30
31
32
33
34
35
def xxx(arg):
def outer(func):
def inner(*args, **kwargs):
print('loading...%s' % (arg))
ret = func(*args, **kwargs)
print('Done')
return ret
return inner
return outer


@xxx('f1f1f1')
def f1(arg1):
print('f1 func'+ arg1)
return True


@xxx('f2f2f2')
def f2(arg1, arg2):
print('f2 func' + arg1 + arg2)
return True


@xxx('f3f3f3')
def f3(arg1, arg2, arg3):
print('f3 func' + arg1 + arg2 + arg3)
return True


f1('123')

------------
loading...f1f1f1
f1 func123
Done

我们使用调试模式来辅助理解带参数的装饰器是怎么执行的

Python解释器加载xxx函数到内存中

执行了xxx函数,并将参数传递给了xxx 相当于执行了xxx('f1f1f1')

解释器走到xxx函数的内部,开始执行xxx的函数体,发现又是一个函数,于是将代码完整的载入到内存中以备调用

xxx执行完毕后,把加载到内存中的outer返回

outer返回后被立即执行(前面提到过,装饰器的两个功能,第一大功能就拿到下一行的函数名当做参数传递给装饰器。在带参的装饰器中,调用装饰器时,其自身已经带有参数,不会直接去找下一行的函数进行传参操作,而是会先用自己已有的参数去执行自己,返回outer后,outer发现自己需要参数,于是去下一行找函数名并传参,接下来发生的事情就和上面介绍的不带参的装饰器的流程是一样的了)

outer函数被执行,将inner函数体加载到内存中

将inner返回(这是这里是将inner函数返回,不要在inner后面加括号!加了括号表示把inner执行结果的返回值返回给原函数f1)

装饰器内的操作执行完后,跳回到调用装饰器的地方(因为Python内部已经将原f1函数体的引用通过传参的方式指给了outer函数的func形参,所以Python解释器不会再去读f1的函数体了)

跳过f1的函数体之后进入到对下一个函数的装饰 …

最后Python解释器读到了程序的入口点(终于可以干活了!)

look!直接跳到了inner函数的内部去执行啦!看来之前分析的没有错,装饰器在返回的时候,将inner函数重新赋值给了f1

在运行到inner中的func(*args, **kwargs)的时候,程序跳到了f1原有的函数体。这也证明了上面的分析,func成为了唯一指向原函数体的变量


参数为函数的装饰器

这样的需求也是有的,看过了上面的个性化定制之后,现在又有了新的需求,就是装饰器有可能会经常变,老板说了,时间长了会审美疲劳~~

应对这样的需求,装饰器也是可以做的,那就是让装饰器传递一个函数,该函数代替了之前写死在装饰器里的代码,可以灵活改变,而且更厉害的是,被装饰器当做参数的函数依然可以有参数~~

1
2
3
4
5
6
7
8
9
10
11
12
13
14
15
16
17
18
19
20
21
22
23
24
25
26
27
28
29
30
31
32
33
34
35
36
37
38
39
40
41
42
43
def before(arg):
print('before' + arg)


def after(arg):
print('after' + arg)


def xxx(func_before, func_after):
def outer(func):
def inner(arg):
func_before(arg)
ret = func(arg)
func_after(arg)
return ret
return inner
return outer


@xxx(before, after)
def f1(arg1):
print('f1 func'+ arg1)
return True


@xxx(before, after)
def f2(arg1, arg2):
print('f2 func' + arg1 + arg2)
return True


@xxx(before, after)
def f3(arg1, arg2, arg3):
print('f3 func' + arg1 + arg2 + arg3)
return True


f1('123')

------
before123
f1 func123
after123

通过上面这种方法实现后,在原有函数的基础上,可以随时方便的更改装饰内容~~


多层装饰器

明白了单层装饰,多层装饰器就很容易理解啦~~

现对业务的具体功能有如下需求:

  • 首先验证用户是否登录
  • 再验证登录的用户是否拥有权限

现在我有大量的业务逻辑方法,每个方法在被调用前都需要去验证前两项,在这样一个项目需求中,多层装饰器就可以被发挥的淋漓尽致

1
2
3
4
5
6
7
8
9
10
11
12
13
14
15
16
17
18
19
20
21
22
23
24
25
26
27
28
29
30
31
32
33
login_status = True
permission = True


def check_login(func):
def inner():
if login_status:
print('--->Login success')
return func()
return inner


def check_permission(func):
def inner():
if permission:
print('--->Authorized')
return func()
return inner


@check_login
@check_permission
def xxx():
print('rm -fr /')


if __name__ == '__main__':
xxx()

------------
--->Login success
--->Authorized
rm -fr /

从上面的代码中可以看出,在一个函数使用了多个装饰器之后,代码是从第一个装饰器的内部函数(inner)开始顺序向下执行,所以在使用多个装饰器时,一定要注意顺序问题!一定要在最上面先验证登录,再验证权限!接下来我们来具体分析一下,为什么不是离被装饰函数最近的装饰器先执行!

如果使用Debug模式来观察执行过程,可以很清楚的看到如下过程:

  1. 首先Python解释器将代码的前两行放入到内存中
  2. 遇到check_login函数,将其函数名放入栈区,函数体放入堆区
  3. 遇到check_permission函数,将其函数名放入栈区,函数体放入堆区
  4. 执行到@check_login时,将获取下一行的函数作为参数,但是下一行不是函数,所以继续向下执行
  5. 执行到@check_permission时,获取下一行函数作为参数,并返回check_permission装饰器内的inner函数返回重新赋值给xxx
  6. 此时之前跳过的@check_login装饰器终于得到了一个新函数作为参数(@check_login获得的函数是@check_permission内部的inner函数)故,将该函数传入到login装饰器中,并返回@check_login内部的inner函数。
  7. 当xxx函数被执行的时候,先执行的是@check_login中返回的inner函数,而在@check_login中的inner函数遇到fun()时,其实该函数是@check_permission函数返回的inner函数,所以在验证完登录后,会立即去permission函数中去验证权限,权限验证通过后再执行的fun()就是xxx函数自己原始的函数体了

总结:顺序很重要!多重嵌套的装饰一定要记住以下两点:

  • Python解释代码时是从下往上返回函数
  • 而程序执行时,功能是从上往下执行

今天跟大家分享的标题叫《收获不止Oracle》 三年前我在一家书店“纳凉”时发现了一本书《收获不止Oracle》 今天抛开Oracle不谈,我们来聊聊这本书是怎么“收获不止Oracle”的

《收获不止Oracle》这本书中讨论的是Oracle数据库调优的问题,到底是什么东西能让人们在本书中的收获不止Oracle的?这个问题要从如何解决Oracle性能瓶颈的问题来入手。

书中解决Oracle性能瓶颈的问题遵循的唯一原则就是少做事儿! 作者肯定的说,少做事儿,就一定能提高效率!道理很简单,举个例子来说~

  • 一个流程,原来需要走6步才能完成,现在在不增加额外负担的情况下把它优化成只需要5步,那效率就一定提高了!

  • 拿算法来说,也可以简单的理解为根据具体情况,找到让CPU运算次数尽可能少的得到结果的办法

少做事儿的思想可以应用到各行各业,当然不局限于Oracle。

如今大火的运维自动化DevOpsCMDB等概念都是少做事儿的最佳体现!但是这三者有一个共同点!出发点都是让人少做事儿,将人工的重复劳动加以归类整合,让机器自己去完成,从而实现了通过少做事儿来提高工作效率。但以上这些理念并没有触及到业务的核心问题!就是业务上是否存在不必要的冗余!

上面提到的技术,解决了让人少做事儿提高效率的办法,那第二个层次就是让机器也少做事儿,就能再一次掀起技术革命,提高运行效率!让机器少做事儿,也可以归到以下两个层面

  • 代码:让单台机器上的代码少做事儿(减少代码级别的冗余)

  • 流程:精简业务集群的工作流程(减少不必要的流程和交互)

针对上面提到的代码级别的少做事儿实践中,最常见的就是优化业务逻辑和算法,比如购物平台的商品推荐算法、搜索引擎里推送广告的算法等等;还有一种情况是干了重复的事情,需要精简

针对流程级别的少做事儿实践中,最常见的优化方法是调整技术架构,精简不必要的流程和业务环节。例如:数据库很慢,就不要让数据库干那么多活,在数据层之上加入中间件就是让数据库少干活的经典体现。再例如:业务逻辑方面,可以让用户一步操作就完成的事儿,就不要弄得那么繁琐。

以上是基于少做事儿的个人理解。提到今天分享的内容,我想起刘龙军“前辈”关于“微服务”理念的那次分享,微服务其中解决的问题之一就是冗余问题,我觉得我们可以把微服务理念理解成面向对象编程里的封装这个概念!面向对象的终极目标是减少重复代码,实际也是少做事儿的一种体现。所以微服务当今大行其道是大势所趋。


最后和大家分享两个我个人关于少做事儿的实践案例

背景:我上家公司的日志处理流程,每天凌晨脚本在client端收集昨天的日志,处理后打包上传到分汇总,分汇总拿到所有数据后对数据进行处理后上传到汇总,汇总对数据处理后将源数据打包上传到备份服务器。大致流程: client–>分汇总–>汇总–>备份

  • 少做事儿代码级别的体现:在client端,服务器以及应用的一些参数经常变化,导致脚本经常因为各种情况而崩溃。经过长时间的考察,我决定比较激进的将client端的环境变量根据更新频率的不同分为三个等级,每个等级的变量的刷新都有自己对应的方式,实现了少做事儿的理念

    1. 变量被分级,每天脚本自动刷新的变量只有获取IP和时间(之前是每天都刷新所有的环境变量),减少因为人工误操作信息表,而读取到错误的应用配置信息

    2. 得益于变量刷新分级制,原来脚本中对于各种各样意外情况的try代码块可以完全剔除

  • 少做事儿流程级别的体现:原日志备份从client端到备份服务器,需要经过分汇总和汇总两道关卡。熟悉业务流程并保证日志有足够多的冗余备份后,剔除掉了汇总这一层的备份流程。由: client–>分汇总–>汇总–>备份 简化为: client–>分汇总&备份–>汇总

    1. 分汇总拿到源数据包后直接将上传到备份服务器,不再经过汇总服务器,减少了一个流程,效率就一定有提高!

上面举的两个实际案例都是少做事儿的非常简单的应用,希望抛砖引玉,可以给大家一点启发~